
Doakey3/VSE_Transform_Tools: Quickly transform, crop and fade video strips in Blender's Video Sequence Editor. Blender Power Sequencer reference · GDQuest. Add Speed Add 2x speed, set frame end, wrap both into META Add 2x speed to strip and set it’s frame end accordingly.
Wraps both the strip and the speed modifier into a META strip. Add Transform Add transform effect to selected image and movie strips. Cgi.tutsplus. IOR / Index of Refraction List - Pixel and Poly. Over the past few years I have been collecting IOR (Index of Refraction) values I can find for use in 3d rendering applications.
Many 3d applications these days allow you to input actual IOR values in order to achieve a more accurate representation of surfaces during rendering of your 3d models. It obviously helps if you know what the correct IOR value is for the type of surface you are trying to re-create. Infographics with blender. The functional art of datavisualization and infographics applied on the blender most used practices of python scripting and modelling.
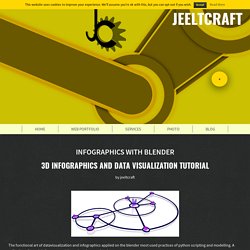
A collection of tutorials from around the web and a complete lesson. I got a small charge for a data visualization some week ago. Cycles tests - the new blender CPU/GPU renderer of awesomeness - Page 176. Blender-Cycles Ray Length node output ~ Agus's 3D box. As I promised I'll try to code new features for Blender, to warm up with the source code base, lets start with some small features first, like this one:Ray length output for LightPathNode: As you can see in the above picture, the absorbed light Rays gets lost inside the material, and the reflected/transmitted rays can escape, the more reflected/transmitted rays the more transparent is the material, the more absorbed Rays the more darker is the surface.What was missing in Cycles was the ability to reproduce the absorption based on the distance that light rays travel inside the surface, as you may guess the final absorption effect will be based on the density of those tiny impurity particles and how wide is the object.

Now, the ray distance output actually gives you the distance of the light traveled, thus you can create a cool node setup to recreate, for example the absorption of the glass based on how wide the object it is:Cycles tests: Cycles Render Settings Explained: Sampling and Light Paths. Jonathan Lampel writes: All of Blender Cycles' sampling and light path settings explained in one video.
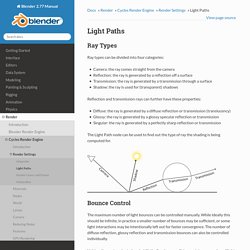
Aimed at beginners, but helpful for anyone. Topics include: sampling, clamp values, path and branched path tracing, volume step size and max steps, min and max bounces, transparency, and much more! Light Paths — Blender Reference Manual. Ray Types¶ Ray types can be divided into four categories: Camera: the ray comes straight from the cameraReflection: the ray is generated by a reflection off a surfaceTransmission: the ray is generated by a transmission through a surfaceShadow: the ray is used for (transparent) shadows Reflection and transmission rays can further have these properties: Diffuse: the ray is generated by a diffuse reflection or transmission (translucency)Glossy: the ray is generated by a glossy specular reflection or transmissionSingular: the ray is generated by a perfectly sharp reflection or transmission The Light Path node can be used to find out the type of ray the shading is being computed for.
Soft lighting through translucent material in cycles. In production environment it is sometimes necessary to cheat light source in the scene, as there is no way that we can bounce light around a room in the exact way the real world does it.
In a 3d environment there will be a limit to the amount of time a light bounces around, in the real world ... pretty much infinite. You will often read about artist creating light sources that aren't suppose to be there in order for 3d scenes to look right. That's where the artistic license come into play. In fact in real life photography, professional camera operator often use reflectors and strobe lights to create extra lighting information to illuminate a rather boring room.
If you do not have enough light in the scene place and area light source around or beside your camera and tilt it around. Creative Shrimp. Leaf Shader for Cycles by xaotherion on DeviantArt. How to use/install Node Groups in Blender. Use Node Groups in your current Blender File: You have found a nice Node Group you like to use in a .blend File you’re working on.

How do you get this inside this .blend to use it? Open the .blend File you want to use the Node Group inClick on File – Append (Shift+F1)Select the .blend File that contains that Node GroupYou see the Folders inside this .blend file, click on NodeTreeselect/click the Node Group you want (press Shift for multiple selection)and hit Link/Append from Library on top rightThe Node Group is now usable in Node Editor – Add – Groupdepending if it is a Node Group for Cycles/Blender Internal or Compositor you might need to switch Node Editor to this type (three little icons on bottom of Node Editor Area)Node Group is saved only as long as it is used in this .blend file (If you don’t use it, save it and reopen the file, the Node Group is gone.
Lighting tips from the Masters. What do I know about lighting after all?
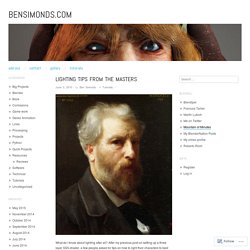
After my previous post on setting up a three layer SSS shader, a few people asked for tips on how to light their characters to best show them off. As it happens, this something I’m rather interested in, and I’ve had a blog post on the subject brewing for a while, so I’ve finally found the motivation to finally write it up. Understanding Digital Colors. When used correctly, color can change the mood of the image, or impact the story.

It can also draw the viewers eyes to a focal element. In the image below, digital colors are used effectively to focus your attention on the tube. And the controlled color palette also helps keep the image calm. Blender Lighting Tutorial - Blender Guru. Ever find yourself placing lamps randomly in the hopes your scene will look good? You’re not alone. 6 Tips for Better Lighting. The difference between a boring image and an outstanding image can often just come down to the lighting. But lighting is such a complex and rarely discussed topic, that a lot of artists are left to just guesswork.
So in this article, I’ll break down some of the common mistakes in lighting, and share with you 6 of my own tips for better lighting in blender. Controlling HDRI Lighting with Nodes. I’ve seen a couple of posts recently on getting more control over HDR based lighting setups, specifically in terms of getting crisper shadows. In particular Reyante Martinez and Greg Zaal each posted some great setups that used the colour of an HDRI map as the input to the strength node of a background shader. I thought I’d add my own experiments to the mix. HDRi Lighting Tricks. Gleb Alexandrov shares 4 tips for lighting with HDRi maps in his rapid-fire format.
Modern render engines like Vray and Cycles make believable lighting extremely easy to achieve with environment mapping. This means we can plug in an image to A) contribute a large amount of ambient light to our scene and B) provide a world of reflections for our reflective objects. Without such a texture map we would need to model and light a huge scene to get the same ambient light and reflection contribution. Generally the best environment mapping results are achieved with HDRi images. Unfortunately they tend to slow down render times and increase noise. How to Make Atmospheric Lighting in Blender. Whispers of anticipation for Volumetrics have been heard amongst the Blender community for a while now. Why? Because it allows you to create stuff like smoke, fire, fog, haze or basically any material that fills the air. And as of a couple of months ago, it was finally added to Cycles :) Using Portals to Accelerate your Render Times. World — Blender Reference Manual. Blender Sushi: CYCLES / Hair! (Strand Info node)
Blender Tutorial 01 - Random Color Material by Obsidianmoon13 on DeviantArt. Cycles - How to change hair color along length of strand? A complete IOR list. Here's a long list with ior values you can use when you create various materials and liquids and much more. This is a compilation of various ior lists scattered all around the web, so there may be duplicates in the list but they're there for comparison purposes and so you can pick either ior value that fits your specific needs. I hope this long list will be useful for someone..
Transparent materials Eye, Aqueous humor 1.33 Eye, Cornea 1.38 Eye, Lens 1.41 Eye, Vitreous humor 1.34 Glass, Arsenic Trisulfide 2.04 Glass, Crown (common) 1.52 Glass, Flint, 29% lead 1.569 Glass, Flint, 55% lead 1.669 Glass, Flint, 71% lead 1.805 Glass, Fused Silica 1.459 Glass, Pyrex 1.474 Lucite 1.495 Nylon 1.53 Obsidian 1.50 Plastic 1.460 - 1.55 Plexiglas 1.488 Salt 1.516 Metals Aluminum 1.39 Copper 2.43 Gold 0.166 Mylar 1.65 Nickel 1.08 Platinum 2.33 Silver 1.35 Titanium 2.16. 5 Tips for Better Materials. 7 Ways to Get Rid of Fireflies In a Blender Render. Fireflies are those tiny burnt out pixels, that ruin an otherwise great Blender render. But how to get rid of them? Here’s several tricks that I’ve picked up over the years… 1. The Cycles Shader Encyclopedia. [Blender Cycles] 8 Indispensable cycles node configurations. Cycles Grass 2. This is my second version of Cycles Grass.
The grass here is seen in many places in life like the grass you see in Football fields, Old villages, and any place you want.... In this version, I've added Translucent Shader to the Grass Material, you can use the grass in more scenes and places, since the old version i uploaded was usable in limited places like forests, swamps and nature scenes. This Grass here used Smooth Curves mode in the particle settings,you must have Blender 2.66 you must change the feature set to Experimental.
[New Tutorial]: Cycles Realistic Grass. Making grass in Cycles – Tutorial. A complete IOR list. Nodes - How to mask animated objects so they aren't visible past a certain area? Blender - Plane Tracking 3ème partie (les masques) - Pole Blender. [Blender 2.5] 3D Object used as a mask. Each object is rendered to a different RenderLayer, with the power of node compositing you can have layers interact with each other and result to a proper masking, making the integration between the background and the 3D objects almost great.Procedure of creation:0.
Rendering - How to use an object as a mask? How to Render onto a Photo Background. Reconstruction 3D avec VisualSFM. A Script to Skin a Point Cloud (for Blender 2.6x or Later) Extreme SfM: fast data acquisition and particular light condition. Converting pictures into a 3D mesh with PPT, MeshLab and Blender. Mesh - Can blender create a topology of a face from real camera? (photogrammetry) 3D mesh captured from video! Realistic Smoke in Blender. Tracking video avec Voodoo. Blender 3D Design Course - All PDF Tutorials. Animated Procedural Textures. [TUT] Video editing with Blender: The Compositor. 3D View — Blender Reference Manual. Understanding the Power of the Skin Modifier in Blender. Why Are Ngons and Triangles so Bad?