
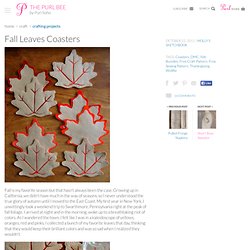
Fall Leaves Coasters. Fall is my favorite season but that hasn't always been the case.
Growing up in California, we didn't have much in the way of seasons, so I never understood the true glory of autumn until I moved to the East Coast. My first year in New York, I unwittingly took a weekend trip to Swarthmore, Pennsylvania right at the peak of fall foliage. I arrived at night and in the morning, woke up to a breathtaking riot of colors. As I wandered the town, I felt like I was in a kaleidoscope of yellows, oranges, red and pinks. I collected a bunch of my favorite leaves that day, thinking that they would keep their brilliant colors and was so sad when I realized they wouldn't.
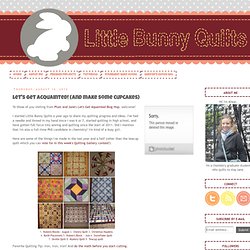
Because the beautiful foliage is, in fact, so fleeting, I wanted to make some pretty leaves that would last all year long. Materials To make 8 total coasters (four of each version): Patterns Version One Cutting Cut an outer leaf piece from the tan felt and a colored felt. For a clearer picture of these markings please see below: Free Tutorial and Pattern: Hex and Heart Coasters - Cosmo Cricket. Remember these cuties? I promised a tutorial and although it's taken a little longer than I anticipated, I have it for you all today. This time around, I used our tiny polka dot pattern from Odds and Ends. They are sweet! First, you'll need to cut your hexagons.
You will need three hexagons in the print you want for the outside of your coaster and one hexagon for the heart. I used a special guide to cut mine, but I also made a pattern for any of you that don't have this tool. Download Hex and Heart Coasters | Free Pattern | Julie Comstock Now you need to cut your heart out of two of your outer-print hexagons. Now you are going to put these two halves right sides together and sew around that heart using a tiny seam allowance (approximately 1/8").
Turn your heart hexagon right side out and press. Now put your heart colored hexagon behind this along with your batting behind that. Take your last outer hexagon and place it, right side down, on top of what you have now sewn. Let's Get Acquainted! (and make some cupcakes) To those of you visiting from Plum and June's Let's Get Aquainted Blog Hop, welcome!
I started Little Bunny Quilts a year ago to share my quilting progress and ideas. I've had a needle and thread in my hand since I was 6 or 7, started quilting in high school, and have gotten full force into sewing and quilting since the start of 2011. Did I mention that I'm also a full-time PhD candidate in chemistry? I'm kind of a busy girl. Here are some of the things I've made in the last year and a half (other than the teacup quilt which you can vote for in this week's Quilting Gallery contest!) Favorite Quilting Tip: Iron, iron, iron! Favorite Blogging Tip: Be yourself! Favorite craft book: Scrap Basket Sensations by Kim Brackett Favorite Books: Harry Potter series and classic literature. Favorite Quilting Tool: My rotary cutter, it was the best use of Christmas money ever.
Favorite TV show while quilting: I usually have Netflix playing on my laptop. Binding: Hand or machine? Onto the important part: Re-run of my guest post: Quilted coasters. In case you missed it, here's the tutorial I posted at Tatertots & Jello last week.
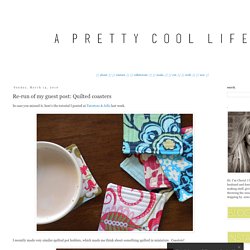
I recently made very similar quilted pot holders, which made me think about something quilted in miniature. Coasters! These are something you can whip up in less than an hour, make a thoughtful (but super easy!) Gift, and only require the most basic of sewing skills (Straight lines only, I promise!). To make a set of 6 coasters, you'll need 12 squares of fabric, 4.5 inches each. You'll also need 6 squares of 4.5 inch batting. , which I love for small craft projects. Pin, right sides together, the top fabric to the bottoms with batting. Sew around each side, leaving a pretty wide gap for turning. After sewing the squares, clip each corner, being careful not to snip the line of stitches. Turn the squares right side out. Poke out the corners. Iron the squares. After everything's ironed, topstitch along the edges of the coaster. Continue doing this towards the center.