background preloader

Crafts

Facebook Twitter

20 Awesome Do It Yourself Projects. Thursday, June 14, 2012 4:30 am, Posted by Chris Groves | Internet 20 Awesome Do It Yourself Projects Topics: At Home Project Ideas , Creative DIY Home Projects , Do It Yourself Projects for 2012 , Fun How To Projects , What to Do with Extra Stuff Are you bored and have a bunch of extra little items hanging around here and there? Well we were in the same boat so we decided to round up 20 different awesome at home projects you can do. Anything from soda pop cap lids to spoons and more. You honestly don’t know some of the creative things you can do with what could possible be junk. That’s why we want to turn ordinary household items into a fun project that may keep you busy or entertained- who knows maybe these will also make great gifts as well? If you know of any great at home Do It Yourself Projects please leave a comment to include your own and maybe we will add it to our list. 1. More info: here | Buy: here 2.

More info: here 3. 4. 5. 6. 7. 8. 9. 10. 11. 12. 13. 14. 15. 16. 17. 18. 19. Crystal Egg Geodes - Martha Stewart Easter. Geodes can be grown without using egg dye. 
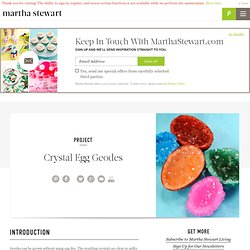
The resulting crystals are clear to milky white, like quartz. While large chicken eggshells are suggested in this process, larger eggshells can be used. Simply increase the size of the plastic or glass container and double or triple the amounts of dye (1 packet), alum (3/4 part), and water (2 parts) used to create the growing solution.

This Easter craft from Jim "Figgy" Noonan doubles as a science project, offering an opportunity to show kids the crystallization process at work. To make a fluorescent variation for Halloween, substitute the water and egg dye solution with glow water. Resources: If you don't want to blow your own egg or would like to try a larger eggshell, pre-blown shells are available from The Eggery Place.

Dye - Dyes From Plants - Pioneer Thinking. Did you know that a great source for natural dyes can be found right in your own back yard! 
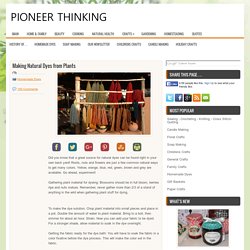
Roots, nuts and flowers are just a few common natural ways to get many colors. Yellow, orange, blue, red, green, brown and grey are available. Go ahead, experiment! Gathering plant material for dyeing: Blossoms should be in full bloom, berries ripe and nuts mature. To make the dye solution: Chop plant material into small pieces and place in a pot.

Getting the fabric ready for the dye bath: You will have to soak the fabric in a color fixative before the dye process. Color Fixatives: Salt Fixative (for berry dyes) 1/2 cup salt to 8 cups cold water Plant Fixatives (for plant dyes) 4 parts cold water to 1 part vinegar Add fabric to the fixative and simmer for an hour. Dye Bath: Place wet fabric in dye bath. Muslin, silk, cotton and wool work best for natural dyes and the lighter the fabric in color, the better. NOTE: It’s best to use an old large pot as your dye vessel. Shades of ORANGE Shades of BROWN. DIY storybook paper roses | DIY Wedding. DIY storybook paper roses You’re going to love today’s DIY project so much that you’re going to want to start tearing pages out from old books tonight!

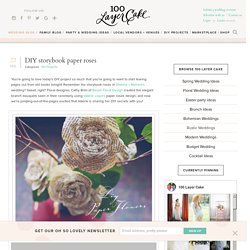
Remember the storybook roses in Shanna + Richard’s wedding? Sweet, right? Floral designer, Cathy Brim of Bloom Floral Design created the elegant branch bouquets seen in their ceremony using Valerie Lloyd’s paper roses design, and now we’re jumping-out-of-the-pages excited that Valerie is sharing her DIY secrets with you! <img class="alignnone size-full wp-image-17711" title="diy-paper-flowers-1" src="<a pearltreesdevid="PTD650" rel="nofollow" href=" class="vglnk"><span pearltreesdevid="PTD651">http</span><span pearltreesdevid="PTD653">://</span><span pearltreesdevid="PTD655">www</span><span pearltreesdevid="PTD657">. Step 1: Gather materials. Step 2: Cutting. Step 3: Shaping. Step 4: Rolling the center. Step 5: Attaching petals. Step 6: Finishing. 30 Fun DIY Crafts To Keep You and the Family Busy During the Holidays | The Aimless Curator.

How to Make a Three-Dimensional Wall Hanging. Ready to craft? This project is so easy, anyone can do it. Before you start making excuses, let me tell you, I’d never painted before. Never used acrylics or done art on canvas. I can hardly even draw a straight line. Now that your excuses are gone, pick your colors and your theme and let’s get started! Need some ideas? Use different kinds of sticks. Maybe leave off the bird and use butterflies. This project should take two days. Day 1, Step 1 in creating your own three-dimensional wall art: Paint your canvases with some acrylic paint. Step 2: Leave the canvases to dry and start preparing your foliage. Step 3: If you plan to use an additional color on your canvases (I mixed some white and light grey to make the moon) you can go ahead and add that.

See the final assembly tips on day two after the paint dries on Page Two! About Erica Mueller Erica Mueller has written 22 posts in this blog. Erica Mueller is a stay-at-home mom to two lively little boys. Pages: 1 2. Craft Tutorial | How to Instagram | Handmade Moccasins | Freshly Picked. Dry erase board out of a picture frame. 133.2K Flares Twitter 7 Facebook 69 Pin It Share 3.9K 3K+ StumbleUpon 129.2K Filament.io Made with Flare More Info 133.2K Flares × I purchased a few cheap 12×16 picture frames from Wal-mart for $3.00 a piece and brought them home, cut out scrapbook paper and attached it to the inside of the frame. I used double sided tape to stick the 12×12 sheets together then just cut off the remaining amount of paper before I attached it to the inside of the frame. I have seen these all over lately and decided to make a few. I have seen them used for grocery lists, caledars, or just for a Honey do list I added some ribbon and rosettes just to spice them up a little bit.

As you can see I also attache a dry erase marker to the side with velcro. Here are a few I made. Professional Wit: Chinese Lucky Stars Rainbow Christmas Tree Garland. I feel melty. | Light&Spoon. EDIT 11/5/2012: We are no longer selling custom crayon pieces in our Etsy shop. We are now focusing on a new jewelry project, so please check that out and we hope you enjoy the tutorial below! Edit: We are now selling custom crayon pieces in our Etsy shop! If you have questions about commissioning your own artwork, please see the shop or email us at lightandspoon@gmail.com.

Here’s our contribution to the melted crayon craze on Pinterest. Anyway! He filled in in with marker, and then we taped some saran wrap around a piece of cardstock to make a run-off barrier for the top of the umbrella. We pulled out all the blues and greys from three boxes we got on sale for $2.50 each at A.C. Then it was just a matter of putting the crayons through the gun–the pretty-but-stupid impulse-buy glue gun that barely works, so I didn’t ruin my good one. The hardest part was removing the guard and fixing the wax around it.

Yay! Like this: Like Loading... Handmade ornaments - Kidsumers. Flora's Blog- Flora Grubb Gardens. Call of Duty Zombies Perk Cola Bottles!!! Recycled Book Page Sphere Ornament {No.11} Materials Needed:CardstockBook Pages or Scrapbooking PaperRibbonEmbellishments {glitter & bell} Begin by cutting a circle template from a piece of card stock. {I simply traced around a 2 1/2 inch diameter jar lid} Using the template, cut out 8 circles from a sheet of cardstock and 8 circles from book pages. You can use any paper you would like for these, however the ornament will hold its shape much better if at least half of the circles are cut from cardstock. Fold each circle in half. Start gluing together the circles, alternating between the card stock and the book pages. I used the tiniest bit of hot glue around the edges and along the bottom. Before gluing the last two circles in place, tuck a piece of ribbon into the center for the hanger.

To add a little sparkle you can brush on a tiny bit of white glue to the paper edges and sprinkle with glitter. DIY Doily Lamp. 
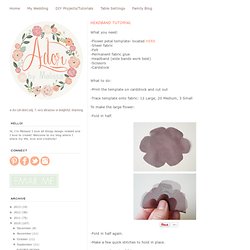
Lightbulb Terrarium. Wall-Mounted Succulent Garden. Yesterday I made this sweet little wall-mounted succulent garden. Today, I could not wait to share it with you. For the first time ever, I've put all of my craft instructions, materials needed and helpful step-by-step photos into a PDF for sale in my etsy shop. I'm selling each PDF for just a few dollars! You guys! A few low-cost materials, and a couple of hours, and you too could have this sitting on your table, hanging in your garden, or greeting neighbors at the front door.

Headband tutorial. What you need: -Flower petal template- located HERE-Sheer fabric-Felt-Permanent fabric glue-Headband (wide bands work best)-Scissors-Cardstock What to do: -Print the template on cardstock and cut out -Trace template onto fabric: 12 Large, 20 Medium, 3 Small To make the large flower: -Fold in half. -Fold in half again. -Make a few quick stitches to hold in place. -Cut a small circle of felt. -Sew the folded petals to the edge of the felt circle. -Sew 8 petals around the edge and 4 in the center, then fluff. Repeat steps to make the medium flower. This is a diagram of how I assembled the petals on the headband. Use small dots of permanent fabric glue to attach the large flower to the side of the headband. Attach the medium size flower above the larger flower, towards the center. Now all you have to do is attach petals down the sides.

Bottle (w)rap. I drink a lot of wine. 
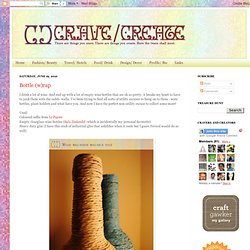
And end up with a lot of empty wine bottles that are oh so pretty, it breaks my heart to have to junk them with the raddi- walla. I've been trying to find all sorts of utility excuses to hang on to them - wate bottles, plant holders and what have you. And now I have the perfect non-utility excuse to collect some more! Used: Coloured raffia from Le Papier Empty clearglass wine bottles (Sula Zinfandel -which is incidentally my personal favourite) Heavy duty glue (I have this stick of industrial glue that solidifies when it cools but I guess Fevicol would do as well) Starting at the bottom (cos the top's a bit tricky) starting winding the raffia tightly around the bottle, pausing to add a bit of adhesive every now and then.

Edited to add: A couple of months later some more string arrived. And about half a dozen wine bottles later, here's what happened: Spring Scrapbook Paper Tree. Hello fellow crafters! 
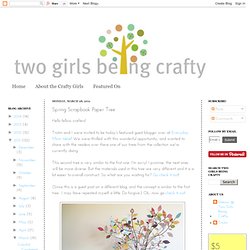
Tristin and I were invited to be today's featured guest blogger over at Everyday Mom Ideas! We were thrilled with this wonderful opportunity, and wanted to share with the readers over there one of our trees from the collection we're currently doing. This second tree is very similar to the first one. I'm sorry! (Since this is a guest post on a different blog, and the concept is similar to the first tree.. Thanks, Julia, for having us on your blog! Six paper flowers. It got into my head that I needed to make some paper flowers. I don’t know why. But I figured it wouldn’t be a big deal because the Internet is a veritable smörgåsbord of craft tutorials, and all I had to do was fire up Lappy 5000 and pick one out.

About 300,000 search results later, I was no longer any more confident in my ability to make a paper flower than I was in my cat’s ability to retrieve his stupid mouse instead of staring at my hand after I throw it. There were just too many choices and although I could compare the photos, they didn’t reflect (1) how good each tutorial was, (2) how closely my flower would resemble the picture, or (3) which flowers would look nice together. Then again, I thought, if anyone is supposed to try every single one, it might as well be me.

After some consideration, I decided that 300,000 might be a few too many to take on, so I narrowed it down to the six most promising and got to work. Wow, that sounded kind of racist, didn’t it? Hope that helps. It’s Party Time : Made From Scratch. Creative Kismet » Blog Archive » little guiding stars. Since the new year has started I’ve been trying to think of ways to be more kind to my self. Especially when that nasty gremlins try to creep in and stump me. I remembered this origami star video on You Tube and had to get them involved in my plan. I thought it would be fun to make a whole bunch with kind words and “you are….” phrases inside. I made 60 of them, enough to last me the whole year if I open one a week, plus a few extra just in case.

I used 12 x 12 inch scrapbook paper and cut 1/2 x 12″ strips, then followed the video HERE*. *UPDATE! Be Sociable, Share! Water Balloon Luminaries. A fun and easy project with a beautiful payoff. Learn how to make these Balloon Luminaries. You will need: High-Melt Paraffin Wax (IGI 1260)Party BalloonsDouble BoilerCookie Sheet Instructions: 1. Fill a balloon with tepid water. 2. 3. 4. 5. 6. 7. 8. 9. 10. Here is an example of these luminaries when using dye. DIY Awesome Xmas Lights With Stuff From a Frat House | Apartment Therapy Unplggd. Paper Cherry Blossom Display. Paper Crafts Home | Paper Crafts. Survival Bracelet (Updated!)