
Making of Ingrid Bergman. About Ingrid Bergman - At the age of 17, Ingrid Bergman auditioned for and was accepted to the Royal Dramatic Theatre in Stockholm.
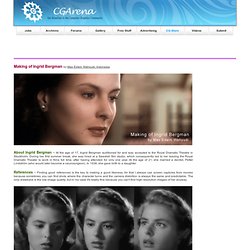
During her first summer break, she was hired at a Swedish film studio, which consequently led to her leaving the Royal Dramatic Theater to work in films full time, after having attended for only one year. At the age of 21, she married a dentist, Petter Lindström (who would later become a neurosurgeon). In 1938, she gave birth to a daughter. References - Finding good references is the key to making a good likeness, for that I always use screen captures from movies because sometimes you can find shots where the character turns and the camera distortion is always the same and predictable.
The only drawback is the low image quality, but in my case it's totally fine because you can't find high resolution images of her anyway. Modeling - I used an old base mesh and jump straight into ZBrush for tweaking. Making of Pink Assassin. While all this work you should always have photo references in sight.
I like to use the freeware program “IrfanView" for viewing pictures. You can set it to “always on top" and place it over the GUI of the program you are currently working in. Making of Prince NyTael. Hi there, my name is Malanjo and I'm from Portugal (Trás-os-Montes e Alto Douro), and I want to thanks to Lynette Clee and the 3DTotal team for inviting me to create this making of.

This is the 1st of 6 characters that I'm creating to apply to Blur Studio (Venice, California). By the way, I wish to also give thanks to Laurent Pierlot and to Alessandro Baldessorini (from Blur Studio) for their personal opinions during the execution of this project. Thanks guys! Okay, let's go!
Concept and Idea So, the goal was to create something like a fantasy monster or an alien - not an "ordinary" alien or monster but one with fur; something visually strong and demanding of respect, whilst at the same time giving the sensation of relaxation and security. After a search on the Internet I found some references, such as from the game "Asura", and I used these sketches and paintings to help create the final mood: With this project, it was necessary for me to make my own sketches, as follows: Modelling.
Making of Anne - Joel Mongeon Portfolio. Modeling a human head in 3D with great edge flow. tutorial. TUTORIAL JOAN of ARC. PEN Productions Inc. Www.zackpetroc.com. Character Design - Nibru by daarken. Varga Hair Tutorial. This tutorial is dedicated to Polycount community. 1.Hairstyles2.Game models approach3.Example of hairstyle 4.Varga You could also check the second part of this tutorial regarding normal mapping(workflow used for Varga ) This is not a step by step tutorial.I will nail down the main stages for creating hair for game characters using lots of images and some printscreens directly from the application used ( maya/photoshop etc ...).
The idea for this tutorial came from the polycount forums ; for the Dominance War II contest i joined Polycount team and the folks there asked me if i can make a little tutorial about Varga's hair so here it is ... 1.Hairstyles This tutorial is about women's hair but the technique work for men as well ;is just that i like long hair for women and my Dominance War II entry happened to be a chick. Where do we find interesting hairsyles? Below there are a few variations for the hairstyle , some of them will be covered in this tutorial.
Back to menu 2.Game models approach. Making of Punk. Sculpting One of the most interesting parts of character modelling is sculpting.
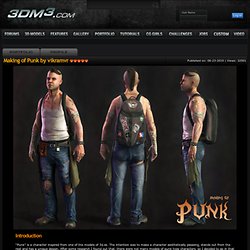
To flesh out a character I use the clay brush or the claytubes brush most of the time. Somehow, I cannot get around using the standard brush, it seems to be destructive in a certain way, and if used with too much depth, it tends to take away the control from the artist. Claytubes brush, on the other hand has an additive way of adding detail. It adds flat details to a surface, so it works like traditional media. Making of Snow. All you need is some tree like this below: Once you have one select your tree, go to Editable Mesh in Selection window enable Ignore backfacing From the top of the scene select all polygons ignoring bottom side is the place where particles will ganerate snow.
Now create particles go to particle systems and pick PArray Set all parameters like shown bellow :) be careful choose object-based emitter at the end - any change might takes long time to update, make sure that yours tree is about 3,3 meters notice that particle size is 0,022m if you make it in wrong size it might affect in owergrowed or to small generated mesh Create Mesher Pick Object PArray And wait antile it finish calculate, in my scene it take about 6h :) I know it's a lot! In place where you hed mesher should appear your snow. Now drag mesh on to the tree and its ready :)