
Diagonal Repeat Patterns in Illustrator. VECTORISATION DE LOGOS, DESSINS, PLANS. Vectips - Adobe Illustrator® Tutorials, tips, tricks, and resources. Lexique d'Illustrator français-anglais. Détails Catégorie : Astuces Illustrator Si comme moi vous trouvez pratique d'avoir sous la main un lexique anglais-français des menus de Adobe Illustrator, en voici une version que j'ai spécialement fabriquée pour la communauté cherchant les traductions.
N'hésitez pas à me communiquer les erreurs ou des ajouts possibles à cette liste. Notez aussi que la disposition des éléments des menus peut varier car certains ont changé d'endroit avec les nouvelles versions. Certains autres ont disparu SVP m'en faire part, je vais les ajouter. Pixel Perfection in Adobe Illustrator. Ever since Adobe Illustrator was launched, people wondered if they could make the transition and change the way they create and develop pixel-based artwork.

As you know, before CS5 using Ai for vector pixel work was a kind of hard/clumsy process. How to create a set of Ice Cream Icons in Adobe Illustrator. In today’s tutorial we’re going to learn how to create a set of ice cream icons, using some basic shapes and tools found from within Illustrator.
That being said, open up the software and let’s get started. Tutorial Details: Create a Set of Ice Cream Icons Program: Adobe Illustrator CS6 – CC 2015Difficulty: IntermediateTopics Covered: Icon Workflow, Basic Shape Building, Compositional Positioning,Estimated Completion Time: 35 Minutes 1. Pokémon Drawn In The Style Of Mayan Illustrations. Design.tutsplus. We're celebrating spring in this tutorial!
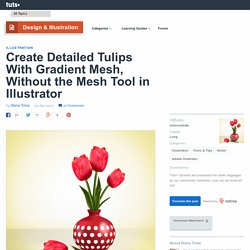
Here you will learn how to draw beautiful tulips in a vase. We'll start with a 3D base and then go on to create tulips with Gradient Meshes without the Mesh Tool, all in Adobe Illustrator. So let's take a closer look. First, open a new document (File > New) then type a name and select these dimensions. Grab the Pen Tool (P) and draw a path like below representing half of a flower vase. Having the path selected, go to Effect > 3D > Revolve. First, move the existing light to the right as indicated (L1) and lower the Light Intensity from 100% to 85%. Take the Ellipse Tool (L) and draw a small 14 x 14px circle. Still having the circle selected, go back to Effect > Distort & Transform > Transform. Apply again the Transform effect using the settings shown and at this point you should have the three effects in the Appearance panel. Select Expand Appearance from the Object menu then fill the resulting group of dots with the color indicated.
Create a Colorful, Funky Robot With Gradients in Adobe Illustrator - Tuts+ Design & Illustration Tutorial. In this tutorial, I'm going to be starting with a sketch which I'll then build up to be a colorful robot friend.
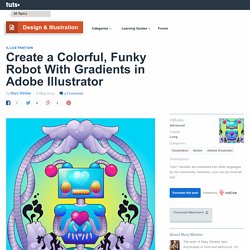
I'll then frame piece in Adobe Illustrator using the Pen Tool, Clipping Masks, and transparent Gradients. So let's get on with it! Start with a sketch of your robot friend. Add details, but don't go too crazy since you'll be rendering them later anyway. Start with the head. Using the Ellipse Tool (L), I made a circle for each of the antenna's base. Repeating this step for both sides and the ends of the antennae.
Sakai Vector Portrait - Go Media™ · Creativity at Work. Hey Go Media faithful!
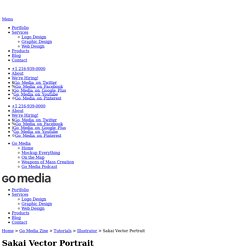
Man, it feels like it’s been years since I’ve posted anything in the Zine. These days all my writing has been focused on my upcoming book Drawn to Business, Designed for Success. I think everyone is going to love the content. It’s all the nitty-gritty details about how we run our design firm, but I digress. This blog post is about a piece of art I created for last year’s WMC Fest. A few sources of inspiration for this design. You’ll notice that it looks like the dragon’s body is snaking back and forth. I grabbed the wings and tail from Vector Pack 19. The Sakai family crest provided to me by Heather. How to Create a Stylish Deer with Brushes and Graphic Styles in Adobe Illustrator. Creating a Simple Kawaii Yeti With Basic Shapes in Adobe Illustrator. Adobe Illustrator tutorial by Madis Põldsaar: creating stylized hair « Adobe Illustrator blog. On the Adobe Illustrator Facebook Page, we have been featuring Fan Fridays each week where we showcase four pieces of work submitted by fans of the page.
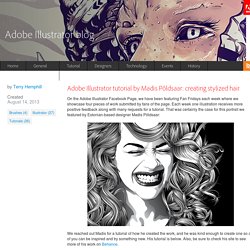
Each week one illustration receives more positive feedback along with many requests for a tutorial. That was certainly the case for this portrait we featured by Estonian-based designer Madis Põldsaar: We reached out Madis for a tutorial of how he created the work, and he was kind enough to create one so all of you can be inspired and try something new.
His tutorial is below. Also, be sure to check his site to see more of his work on Behance. Want to submit your work for Fan Friday? Note: you can download the brush referenced below by Madis on DeviantArt. Working With Blending Modes and Gradients to Create a Dark Elf. In this tutorial, you'll learn some great tips and tricks on using multiple gradients and Blending Modes to create an enchanting dark elf character in Adobe Illustrator.
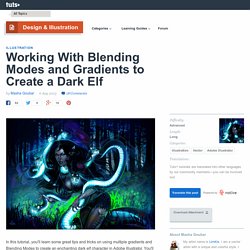
You'll see the work flow from sketch to finish and see how creating your own brushes can add those fine refining details your illustration may need. I start by creating the sketch of my design using the Pencil Tool (N) with a fine Stroke Weight of around 0.1pt. This thickness is convenient because it easier when drawing smaller parts when you're zoomed in at about 300-700%. Illustration 3d isométrique : bases et techniques avancées. Tresadenn (Philippe Cam) présente via deux vidéos HD le processus à suivre pour réaliser des illustrations en 3d iso facilement.
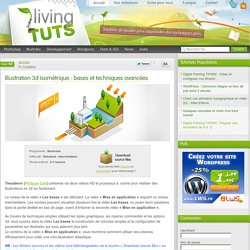
Le niveau de la vidéo « Les bases » est débutant. La vidéo « Mise en application » requiert un niveau intermédiaire. Les novices peuvent visualiser plusieurs fois la vidéo Les bases, ou poser leurs questions dans la partie dédiée en bas de page, avant d’entamer la seconde vidéo « Mise en application ». Au travers de techniques simples utilisant les styles graphiques, les repères commentés et les options 3d, vous suivrez dans la vidéo Les bases la construction de volumes simples et la configuration de paramètres sur Illustrator qui vous aideront plus tard. Le contenu de la vidéo « Mise en application », vous montrera comment utiliser ces volumes efficacement pour créer une mini-illustration didactique. NB : Les fichiers sources et les vidéos sont téléchargeables via le bouton « Download source files » au début du tutoriel. Qu’est-ce que la 3d isométrique ? I. 1. Illustration 3D isométrique (vidéo inside) « Lordyoyo. Hello !
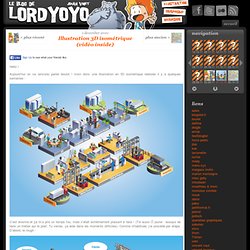
How to Create Funky 3D Springs in Illustrator. Many of us have done this before in Auto CAD, 3D Max or Maya. In this tutorial, we will learn how to create 3D springs in Illustrator. We'll be using the 3D Revolve Tool and some manual effort to obtain this quality vector result. Hope you find it interesting! Republished Tutorial Every few weeks, we revisit some of our reader's favorite posts from throughout the history of the site. Below is the final image we will be working towards. How to Create Sheet Rolls with Custom Spirals. In this tutorial, I’ll explain how to make custom spirals (apart from the default spiral tool), and use them creatively in making rolls of paper. So far, I came to know that the spiral tool does not allow a uniform decay (equal spacing) between each wind of a spiral. In this tutorial, I will expose some basic tricks to do so. Hope you find it interesting.
Below is the final image we will be working towards. Want access to the full Vector Source files and downloadable copies of every tutorial, including this one? 3D Charts in Adobe Illustrator CS. Adding transparency and depth to graphs By Dave Nagel The default graph styles in Adobe Illustrator aren't exactly awe-inspiring. Come to think of it, graphs in general are pretty boring. But they can be critical for conveying information to an audience with a short attention span. So, when the marketing department hands you some data to "jazz up" for a meeting or your editor hands you a table to format for a sidebar, it's your God-given duty as a designer to get that thing into some semblance of presentability or die trying. One popular way to do this, of course, is to generate 3D graphs to create a sense of depth in the image.