
Complexgeometries four hole tee. DIY Peter Pan Collar. We almost lost our marbles when we first spotted these scalloped white Louis Vuitton collars on the runway.
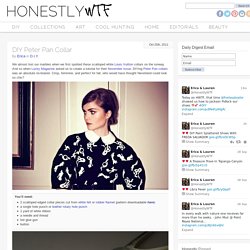
And so when Lucky Magazine asked us to create a tutorial for their November issue, DIYing Peter Pan collars was an absolute no-brainer. Crisp, feminine, and perfect for fall, who would have thought Neverland could look so chic? You’ll need:2 scalloped edged collar pieces cut from white felt or rubber flannel (pattern downloadable here)a single hole punch or leather rotary hole punch1 yard of white ribbona needle and threadhot glue gunbutton Using the pattern template, cut out the two collar pieces.
Create small holes between each scallop, using the hole punch. Overlap the two wider end pieces and push a button through the last two aligning holes. Cut the ribbon into two half-yard lengths. Wrap the collar around your neck and tie it into a bow. Your Louis Vuitton inspired peter pan collar is finished! DIY Elbow Patch. While perusing Pinterest one evening, I came across an intriguing tutorial on the wonderful art of needle felting.
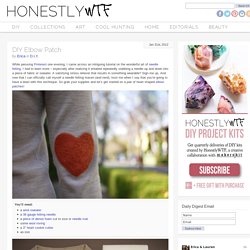
I had to learn more – especially after realizing it entailed repeatedly stabbing a needle up and down into a piece of fabric or sweater. A satisfying stress reliever that results in something wearable? Sign me up. And now that I can officially call myself a needle felting maven (and nerd), trust me when I say that you’re going to have a blast with this technique. So grab your supplies and let’s get started on a pair of heart shaped elbow patches!
You’ll need: With the sweater on, place a piece of tape about half an inch below the elbow. Align and center the bottom of the cookie cutter along the top of the tape. Fill the cutter, spreading out the wool fibers evenly. At the base of all felting needles are tiny, sharp burrs, which grab and interlock the wool fibers. Continue stabbing away until the surface is flat and even. Carefully peel the sweater away from the foam. DIY Bow Tie. A couple of weeks ago, we celebrated FNO by DIYing bow ties and neckties from scraps of denim at Madewell – because honestly, who isn’t borrowing a bit of inspiration from the boys this season?

Today we’ll be showing you, who may have missed the event, how to DIY a bow tie with luxurious, Dolce & Gabbana-inspired velvet. Before you know it, you’ll be well suited and ready to channel your inner Marlene Dietrich! You’ll need:a 6″ x 3.5″ piece of velveta 0.75″ x 2.5″ piece of velveta 1″ pin backa glue guna rulera pen Start by drawing a vertical line and a horizontal line, dividing the rectangle into 4 equal quarters. Pinch the intersecting lines and pick up the velvet. Flip the piece over, while still pinching the backside, and place a drop of hot glue in the center. Place another drop of glue on the front side and fold the fabric closed.
Turn the bow on its backside and glue the tip of the velvet strip to the center. A pair and a spare . diy fashion. Color Popped Collar + Glitterly Chunky Heels « {Photos Credit L to R}: Siliorona.com, Chloe Sevigny for S MODA Magazine, Equipment, Vince Camuto Because of the mild Winter across the US many weather ladies and gents have dubbed January 2012, Juneuary.

I have to say I’m in love with the 76 and sunny and type weather we’re having in SoCal. So in honor of Juneuary, and hopefully Febune, I’m skipping anymore Wintery type DIY post and bringing on Spring a little early. Color is the most exciting thing about Spring trends. Here’s a quick and easy way to bring a little color to those boring button downs. Materials: Button Down Shirt, Stained by Sharpie Fabric Marker Be as creative as you wish! I paired my colorful button down with my pair of DIYed glitter chunky heels. Have fun! Simply screen DIY: Geometric Jersey Circle Scarf. I'm super excited to share this project!

Thanks to Plaid Crafts (which is home to many of the supplies both artists and crafters use) I was able to test out Simply Screen, an at home screen printing kit. I was really intrigued by the concept, and was 10x more intrigued when I actually received the kit. You basically create your own reusable screens, which I soon learned that I prefer much more over stencils. I made a circle scarf with Simply Screen, using a long strip of nude jersey & a geometric design that I made on Photoshop. It's something that I wish I had in my wardrobe for a while, but never had the means of making. Some of my good friends - hi, Abby! This screen printing kit is great for those of you who want to incorporate art into craft. The paint that's used for Simply Screen kits are both acrylic and non-toxic, so it's safe to use for all ages.
You can also buy refill screens to create more designs, so you only have to buy the actual kit once. Hair and Make-up by Steph. Pencil skirt from scratch, baby! Knit midi circle skirt with elastic waist tutorial. Copy Catwalk: stand and deliver skirt. Tube or circle scarf.