
5 Things I Do To Every Portrait. Make Your Amateur Photos More Professional. With everyone and their grandmother having a digital camera you can make almost anybody look like a professional photographer, well, better-than-amateur at least.

You can use this simple process on almost any photo you take. Let’s start with our regular, old, point-and-shoot photo. This one was taken with a little higher-end camera, but it can still use a lot of work. First, we’re going to sharpen our image a bit using the Unsharp Mask [Filter > Sharpen > Unsharp Mask]. We don’t want anything too drastic, so I used some low settings. Now we’re going to add a Levels Adjustment layer [Layer > New Adjustment Layer > Levels].
Next step is to add a Brightness/Contrast Adjustment layer [Layer > New Adjustment Layer > Brightness/Contrast]. One more adjustment layer… the Hue/Saturation Adjustment layer [Layer > New Adjustment Layer > Hue/Saturation]. Now you can probably already see how much of a difference these few steps make. It’s a subtle change, but it usually makes the photo look nicer. Removing Acne, Skin Blemishes With The Spot Healing Brush In Photoshop.
Written by Steve Patterson.

In this Photo Retouching tutorial, we’ll look at one of the most amazing and time saving photo retouching tools available, the Spot Healing Brush, the first of three image "healing" tools in Photoshop. The Spot Healing Brush was first introduced in Photoshop CS2 and, like the other two healing tools (the standard Healing Brush and the Patch Tool), it’s essentially a texture replacement tool, meaning that it tries to create a seamless repair by replacing damaged or unwanted texture from one area in an image with good texture from another area, without changing the problem area’s original color or brightness values. What makes the Spot Healing Brush so amazing and fast is that it does this with almost no effort from us! Both the standard Healing Brush and the Patch Tool need us to tell them which area of good texture we want to use to replace the bad texture with, but the Spot Healing Brush makes the decision all on its own.
Let’s get started! How TO WHITEN TEETH IN PHOTOSHOP - Learn how to do it NOW. Posted on 07.
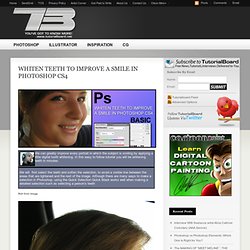
May, 2009 by Olson in Basics, Photo Editing Roll Over Image Open a image and Zoom in to make a selection. Select the Quick Selection Tool. Make sure that the Add to Selection and Auto-Enhanced are selected. Start making your selection. After you are done click on Refine Edge. Play with the setting to get the desired result the most important option here is Feather in our case we enter 1px. To get a live preview of the edge refinements press F cycle through the preview modes. Click OK Now click the Hue and Saturation Button in the adjustment panel. Note: that a new adjustment layers is created and the selection is hidden. In the Hue/Saturation option select Yellows. Click and drag the Saturation slider slowly to the left to remove the yellow, in our case a value of -80 works just fine. Click and drag the Lightness slider slowly to the right to brighten the teeth.
Select Master form the menu. Click and drag the Lightness slider slowly to the right to complete the effect.