
Sylvain Bouland's Portfolio - Video game artist. Resume - Demo Reel - Professional work - Personal work - Work in progress - Tutorials - Contact - Links Tutorials In this tutorial, I will show you how to create a cavity map from your normal map within Photoshop.

This is pretty useful if you bake your normal maps within 3ds Max or another 3D software. If you bake by using Xnormal, you can automatically render a cavity map. For this short tutorial I will take as example the normal map I created for the sewer cap in the previous tutorial about the floaters. Go in the Channels of your normal map, select the green channel, do Ctrl-C, and paste it in the layers. Once you are done, hide the red layer, unhide and select the green layer. Set your red layer in overlay, merge the two layers together by doing Ctrl-E. Enjoy. Smoothing_groups.jpg (1200×743)
So you want to be a pixel artist? - Photoshop tutorials and Pixelart tutorials, smiles and pixelart. Part 1: The Almighty Grass Tile Ah yes, the grass tile...Generally the first tile anyone does, because hey, if you're making an RPG, and you plan to have it take place on a world, you're probably going to need grass.
It's a good way to warm up and get into drawing the tiles, so let's start with it. Let's cover some different methods of making grass. You've probably seen these, if you've checked out a lot of games: These aren't all the methods, of course, but these are some popular ones. So then we come to the more "complex" grass tiles...The ones that have tons of dots in them. Another method is to simply paintstakingly draw in the blades, going from shade to shade. Now you can use whatever method you like, and there are a lot of different ones...Just remember that grass shouldn't look totally flat, and using the same tile and just changing the shades looks horrible: Do not, I repeat do NOT do this. Contents: Author of this page had got the permission to host this tutorial here.
Damian Lazarski. Reducing seams In this section I will discuss the methods that can be used for reducing texture, shading, material and physical seams in UDK environments.
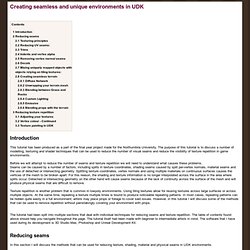
Texturing principles In this section I will discuss the process of planning and designing the textures for your environment in a way that will allow you to hide the seams with ease. The first step for reducing seams in your environments is to divide the types of your assets into three categories; structural, mixed and organic. Normally, you may think of organic assets as objects that have irregular shapes, such as rocks or trees. The type of texture information will usually dictate what solutions will be best at reducing the seams. When it comes to creating the textures, you might want to decide right from the start what type of texture you are trying to make. When you are making mixed textures you are not bound by any rules. When it comes to making organic textures, the rules are also more relaxed.
Reducing UV seams: Trims Decals Emissive. WORKING WITH MODULAR ROCKS. Tutorial by Philip Klevestav < Back to Tutorials Index page This tutorial will take you through some steps I use when working with more organic type of modular units.
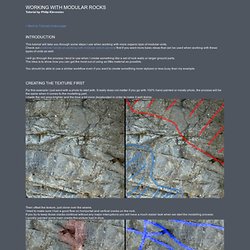
Check out a tutorial I wrote on working with modular sets in general first if you want more basic ideas that can be used when working with these types of units as well. I will go through the process I tend to use when I create something like a set of rock walls or larger ground parts. The idea is to show how you can get the most out of using as little material as possible. You should be able to use a similar workflow even if you want to create something more stylized or less busy than my example. For this example I just went with a photo to start with. Then offset the texture, just clone over the seams. This example will be pretty busy with cracks and such and would not work that well if you get very far from the mesh. And I got an OK result as a base from that.
Here are the texture flats. Here I just added this mesh in Unreal.