Pretty Punk Princess DIY Black Flowers Head Crown. DIY Leather Cat Ears Headband. I know, I know, everyone and their mother has done a DIY cat ears project and tutorial, but none like this {maybe?}
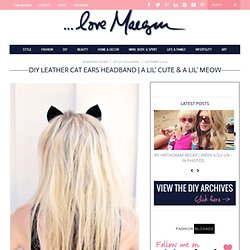
Lol. I searched for a leather pair a little bit like this cat ear headband by Fleet Ilya {$518} but less like Bat Girl or Cat Woman {though they would work for those costumes too}, and a bit more wearable, and found little to my liking… thus, a DIY. Leather was my textile of choice so I had to figure out how to make them stand upright without flopping over like a pug.
Here’s what I came up with… What You’ll Need… * Black Leather* Pinking Shears* Revolving Leather Hole Punch{this is a good tool to keep on hand for adding holes to your belts, shoes, etc.}* Stretchy Headband Comb* Needle/Thread Steps… * Cut out your cat ears from your leather. . * Pinch the bottom/center and put a few stitches through each {use a larger needle & you may need pliers to help pulling your needle through the leather} . * Open them and flatten out the bottoms and they should look like this. Voila…Voila! DIY Leather Cat Ears Headband. DIY Leather Cat Ears Headband. DIY Chanel Pearl Hairpins. This week’s DIY, requested by a reader, was inspired by the abundant and delightful use of pearls in Chanel‘s Spring 2012 Collection.
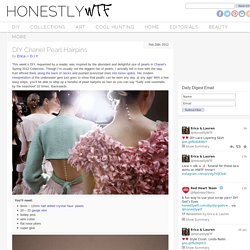
Though I’m usually not the biggest fan of pearls, I actually fell in love with the way Karl affixed them along the back of necks and pushed oversized ones into loose updos. His modern interpretation of the underwater gem just goes to show that pearls can be worn any day, at any age! With a few easy steps, you’ll be able to whip up a handful of pearl hairpins as fast as you can say “Sally sold seashells by the seashore” 10 times. Backwards. You’ll need:8mm – 12mm half drilled crystal ‘faux’ pearls20 – 22 gauge wirebobby pinswire cutterflat nose plierssuper glue Start by cutting off a 5 inch piece of wire. Put a few drops of super glue onto the tip of the folded part and insert it into the pearl. Allow it to dry completely.
Continue to wrap tightly 5-6 times. Now, secure the pearl by wrapping the other side around the bottom half of the pin. Painted Bobby Pins (with nail polish!) Normally I would want my hair pins to be strategically tucked into my hairstyle making them inconspicuous, but these bobby pins are too cute to be hidden!
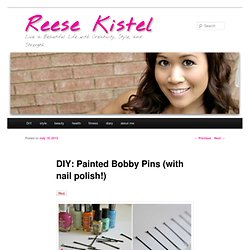
Just paint with one or two coats of your favorite nail polish, let dry, and they are ready for show. Keyboard Hair Clip. Head Scarf. After many requests, I finally made a tutorial on how to tie a simple head scarf.
It's really, really easy. I did this without looking in the mirror, so that should tell you how easy it is. Let's get started! Start with a large, square scarf. I like my vintage silk scarves because they're soft and not bulky. Fold one corner to the other to form a triangle. Fold the corner down to about the middle, and then fold over again (but not all the way to the edge, because you want it to be a little thicker). Put the scarf around your head with the ends in the front, making sure the wrong side of the scarf (the part where you can see the folds) is against your head.
Tie it in a loose knot at the front. Tuck the ends behind/underneath the scarf. Done! Jeweld Black Velvet Headband. Easy Headband. How to Make a Simple Bow. These little bows are so simple and fun-- I make them all the time.
They are so versatile-- you can wear them as shoe clips, hair clips, broaches, whatever you want! Bobby Pins. This year, I'd really like to stay on top of birthday gifts.
It seems like I'm always making a last-minute run to the toy store on the way to the birthday party. Not this year. I'm going to stay ahead of the game by making birthday gifts ahead of time so they're ready to go well before the party arrives. I've given these bobby pins to several of my friends' daughters and they're always a hit. I've seen these selling online for as much as $2.50 each. Step 2: Cut circles of fabric to fit the button form. Step 3: Cover the buttons according to package directions. Step 4: Using needle-nose pliers, gently remove the shanks from the buttons. T-Shirt Braided Heanbands. I was walking through Target a few weeks ago and noticed this little knit fabric headband that was not just braided together…….but woven.
I decided they were charging way too much for something that could be made with t-shirt scraps. And that means free. Bohemian Chic Hair Pin. Yet another DIY!
Summer is a time to create and when summer hits I definitely put down my knitting needles a bit more…THE HEAT! It is hard to knit with even the softest wool fiber when it is close to the triple digits outside. So here is a fun tutorial for those of you who are taking a breather from knitting. This clip was designed using a button off one of my old sweaters and some feathers I already had on hand (from all the feather extensions I have been putting in).
If you purchased feathers for feather extensions and you have some left this is a great project to use them up on. 1. 2. 3.Bobby Pin (or Alligator Clip) 4. 5. 2x2in square of felt 6. First, holding the button on top of the felt cut the felt to the same size as the button. Once you have cut the felt circle fold it in half and make two small incisions for your bobby pin to attach through.