
The Hipster Home » Blog Archive » How to Make a Tiny Terrarium in a Light Bulb. Ahoy there Hipster Homers!

I’m Julie and I’m the very first guest blogger on this fine site. Today’s project involves breaking stuff, plants, found objects, and miniatures. Fun, right? Let’s get started! We’re going to go through the steps to create your very own little terrarium. Dos and Don’ts: Do use sand or small pebbles; these are good because water drains through them easily. How To: You’ll need a few tools to make a tiny terrarium but nothing complicated to get started. Needle-nose pliersScissorsLong tweezers or chopsticksFlathead screwdriverGlasses or goggles Let’s start with the light bulb.
We will be removing the inside parts of the lightbulb. First, remove the metal tip from the bottom of the bulb. Then, when enough of the sides are raised to get a good grip on them, hold one of the sides with your pliers and yank out the metal tip. Next remove the black glass. Now you will be able to see the interior parts of the light bulb. Irish landscape with wee wool sheep by weegreenspot. Vacation Memory Jars - Martha Stewart Scrapbooking & Memorykeeping.
Wooden Shim Interchangeable Picture Frame {custom family silhouette printable} I have had some wooden shims left over from the custom natural wall art piece I did awhile ago and thought I would put them to good use.
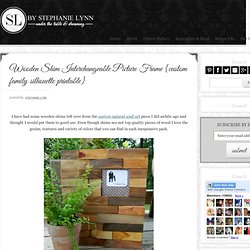
Even though shims are not top quality pieces of wood I love the grains, textures and variety of colors that you can find in each inexpensive pack. If you have done a previous project with shims, this frame makes perfect use of the cut odds and ends left over. Plus since it is a custom piece – you can make it as large as you wish creating a personalized piece of wall art at a fantastic price! Materials Needed:Wooden Shims{a pack of 8 inch shims is only around $1.30 at your local hardware store -scrap pieces can also be used for this project}A Piece of PlywoodHot GlueWood Stain or PaintMod Podge or DecoArt Decoupage A Printed Picture / Scrapbook Paper Being by cutting a piece of scrap plywood to your desired size. Start placing the cut shims on the plywood in a random pattern. Chalkboard Globe Makeover {Message Center} Large Glass Carboy Water Jug Find {& How to Apply Cut Vinyl to Glass}
Recycled Sweater Vase {Lindsay's $5 Challenge} I adore Country Living and was totally inspired by that warm cozy feel of recycling old sweaters into natural rustic decor.
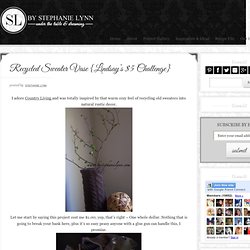
Let me start by saying this project cost me $1.00; yep, that’s right ~ One whole dollar. Nothing that is going to break your bank here, plus it’s so easy peasy anyone with a glue gun can handle this, I promise. Crafts to make / stones. How to make needlefelted acorns. Today I felt like sharing the needle felt technique as I love to do so during autumn.
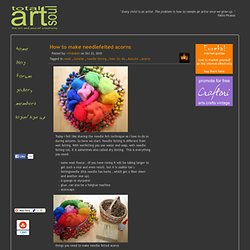
So here we start. Needle felting is different from wet felting. With wetfelting you use water and soap, with needle felting not. It is sometimes also called dry felting. Mason Blue Glass Canning Jar DIY. These jars take their name from John Landis Mason.
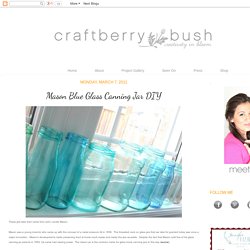
Mason was a young inventor who came up with the concept of a metal screw-on lid in 1858. The threaded neck on glass jars that we take for granted today was once a major innovation. Mason's developments made preserving food at home much easier and made the jars reusable. Despite the fact that Mason sold five of his glass canning jar patents in 1859, his name had staying power. The mason jar is the common name for glass home canning jars to this day (source). In the spirit of optimism let's start with the good news... The jars, in my humble yet clearly biased opinion, turned out pretty fantastic. I like the contrast of the yellow flowers... ...and the rustic feel of the cement wall behind them. Recycling project no. 6 - junk mail trees. So here they are.
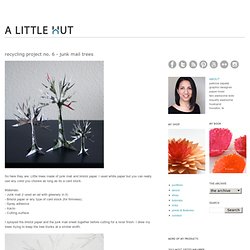
Little trees made of junk mail and bristol paper. I used white paper but you can really use any color you choose as long as its a card stock. Materials:- Junk mail (I used an ad with greenery in it)- Bristol paper or any type of card stock (for firmness)- Spray adhesive- Xacto- Cutting surface I sprayed the bristol paper and the junk mail sheet together before cutting for a nicer finish.
I drew my trees trying to keep the tree trunks at a similar width. Make a cut perpendicular to the base (important!! The trees are half white and half junk mail. Here are the same trees rotated to show the cardstock side. I hope these instructions are clear enough. Make Your Own Gifts LIGHT BULB TERRARIUM – Green Holiday Gift Guide.
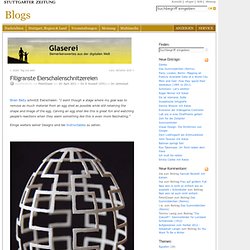
Filigranste Eierschalenschnitzereien bei Glaserei. Brian Baity schnitzt Eierschalen: “I went though a stage where my goal was to remove as much material from an egg shell as possible while still retaining the shape and image of the egg.
Apartment Therapy San Francisco. Crafts to make / Flickr: Your Photostream. EfemeraInk. Ginette Lapalme « Drawn! The Illustration and Cartooning Blog.