background preloader

Blog

Facebook Twitter

Anthropologie. Making a Capelet from an Old Sweater Video. How to Make a Capelet from an Old Sweater I’m Claire. I have an Etsy Store called Small Stars and I sell vintage Capelets made from felted sweaters. I’m a costume designer and a technician. I've worked for L.A. operas, into theater group and film. This capelet is really good for an L.A. winter. So today we’re going to turn our sweater into felt and I have with me a red sweater. I tend to look for like anything wool and Angora Kashmir.

I think my costume system work for a long while which meant that I was doing a little shopping or fabric shopping sampling and I felt that I wasn’t actually having anything tangible that I created in there. When you’re searching for a production, it’s almost when you have a design. My mom knew how to sew and did tried to teach me how to sew. My favorite stage is putting the sweater on the set and finding the trim and the buttons that go with it. I think some black lace would be really nice. Everything I make, I make as if I was making it for myself. DIY Découpage Floral Bag. When H&M asked us to DIY a boho-inspired item for their summer issue, découpage was the first thing that came to mind.
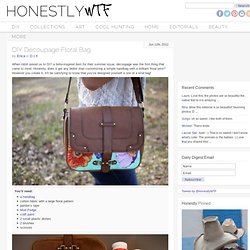
Honestly, does it get any better than customizing a simple handbag with a brilliant floral print? However you create it, it’ll be satisfying to know that you’ve designed yourself a one of a kind bag! You’ll need:a handbagcotton fabric with a large floral patternpainter’s tapeMod Podgecraft paint2 small plastic dishes2 brushesscissors Start by taping off the edges and hardware of the handbag. Squeeze a dollop of colored craft paint into a small disposable container. Allow the first layer to dry completely. While the paint dries, carefully cut out a handful of flowers from the fabric. Arrange them onto the painted section of the bag. Remove the painter’s tape when the Mod Podge has dried clear and your floral handbag is complete!

(all images by HonestlyWTF) Perfect Summer Bangle. Here's a fun tutorial on how to make a message bangle that's one-of-a-kind, done in the sun, waterproof and weatherproof. Even after several trips to the beach, it won't fade or wash off! Essentially, it's the Perfect Summer Bangle. Used in this tutorial: Inkodye Red Prepare. Transcribe.

Perfect. Pour. Brush. Wipe. Wrap. Tape. Expose. Develop. Cut. Reveal. Wash. Enjoy. Vinyl Record Purse| DIY Fashion and Craft TutorialsStars for Streetlights. Whenever I go to thrift shops, I always browse through all of the old records they have for sale. The designs, the colors, the album art-- they're so fun to study the designs in pop culture a few decades ago. There are many ways to use old records, but one of my favorites has always been a purse. Whenever I see a vinyl record purse in a boutique or online, they're always SO expensive. So I decided to make one of my own. To make a record purse, you need: -3 Vinyl Records -An old purse strap -A split ring to attach the strap to on the record purse -An old black t-shirt and some fabric for the lining -A drill -A piece of wood to put underneath the record when you're drilling -Embroidery thread/ribbon -Oven -Scissors First I cut off the bottoms of the 2 records that make the outside of the purse.

After the records were cut, I used a drill to make holes all around the border of the records. Then I stitched the bottom of the small piece to the larger record pieces with ribbon. Inside. Tutorials for Recycling T-Shirts. So way way back, in June, I wrote this Studio Organization post, about starting the process of organizing my studio by cleaning out the closet full of junk. Well, it's September and...let's just say the closet is a work in progress. Some of the things that are taking up space in the closet are shirts that I never wear anymore. I realized I could repurpose them into something else! Here are some tutorials for recycling shirts: Check out these t-shirt scarves! (I apologize, this site seems to have removed their tutorial for this project.) Create cute little bows for accessories or packaging with this tutorial.

Gorgeous ruffled pillow tutorial here. Looks like I have a lot of projects ahead of me to keep me from cleaning out my closet! DIY Braided Clay Bracelet. Yes I am obsessed with polymer clay. Its such a fun material to work with because if you mess up... you just mash it all up and start again. Today's DIY is a spin off of this project that I did a little while back. Knead the clay with your hands to soften it up. Using the palm of your hand roll out three long tubes. Mash the top of the tubes together and begin braiding.
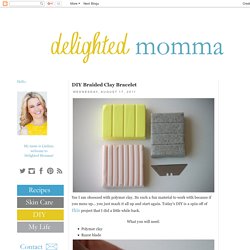
Using your own wrist as a guide determine how long you want to make your bracelet. Connect the two ends and gently mash ( I cant think of a better word so mash it is) the two ends together. Bake for 25 minutes at 245 degrees. I decided bright yellow was not very "fall" so I switched it out for bronze. Have a little wrist party and make as many as you want! If you want to see more ways to create with polymer clay you can check here here and here. Two Inspiring ReStyles by Tick Tock Vintage. Our newest entries into Project ReStyle come all the way from philadelphia! This super cute oversized vintage dress to cute mini dress had me itching for a good thrift/sewing session. Inspiring, no? This Suede skirt to a purse ReStyle is so amazing! I love the idea of making a purse from an oversized skirt.

The tassels are so pretty too! Special Thank yous to Veronika of Tick Tock Vintage for whipping up these inspiring ReStyles. DIY Projects « Fossil Blog. DIY rope bracelet from a J.Crew shopping bag! « sideoats + scribbles. I must confess, I love jcrew so much. I even love the bags! (Hate to throw them away.) Then it hit me: why not make a rope bracelet from the handles? Here’s how I did it in just a few steps. (It took longer to write this up than it did to actually make it!) First, remove the handles from the bag. Braid your bracelet, then use another clothespin to hold it in place. Now for the only tricky bit. Here are some closeups of the knots so that you can see them better. Now to finish it up, take the piece of the handle that you trimmed and knot it around the other end, then remove the clothespin. Then you can tidy up and trim off to even things up. To wear, just slip the big knot into the back.
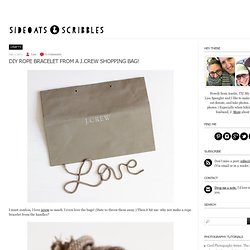
That’s it! I think it’ll go great with all my striped shirts this summer — I have a major stripe obsession going on right now! Xo, Do It Yasself.

Gallery

Blog. May 27th, 2012 Lace inserts are a popular denim DIY this summer. Usually done with white lace and light denim I wanted to mix it up and try it with black! Sources: (Top Left – Right) 1. Clones ‘N’ Clowns 2. Refinery29 3. What you Need: Shorts/Jeans – I got mine from Value VillageLace – Mine is the edging of fabricScissorsThreadHand Sewing NeedlePins Loading ... Categories: Blog, Do It Yourself, Shorts of the summer series May 25th, 2012 One of my favourite parts about thrifting is finding that amazing item that is great quality but CHEAP. Categories: Blog, Thrifted Outfits, Toronto Vintage May 4th, 2012 I think everyone who thrifts has those few items that you look for each time you go. A Little History Coco Chanel is credited for making the tweed suit fashionable in the 1960′s. source: Coco Chanel A lot of Inspiration Today the tweed suit is still popular but in separates. Source: Aime La Mode source: Wendy’s Lookbook (great blog!)
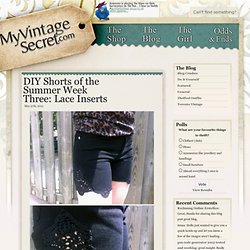
Source: Clemence Posey via Fab Sugar source: La Mode Classics: 1. Pics. Weekend designer. A Pair and a Spare | DIY Fashion | Tutorials | Style. Style Scrapbook. P.S.- I made this... Charlotte Tang | Ramblings of a Designer.