
andrea garces
How to build a pallet vertical garden and a DIY plastic wall garden. Surely, you have already heard about vertical gardens.
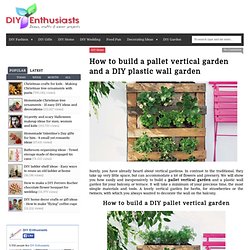
In contrast to the traditional, they take up very little space, but can accommodate a lot of flowers and greenery. We will show you how easily and inexpensively to build a pallet vertical garden and a plastic wall garden for your balcony or terrace. It will take a minimum of your precious time, the most simple materials and tools. A lovely vertical garden for herbs, for strawberries or the twiners, with which you always wanted to decorate the wall on the balcony.
You will need: 1 wooden pallet ( which is used for transport of goods), a burlap, sturdy garden film, scissors, furniture stapler, universal soil, plant seeds or young seedlings. Materials for pallet vertical garden How to do it: Attach the burlap to the inside of the pallet. Turn the construction with the open end up and fill the entire volume with soil. The special thing in this pallet vertical garden is the ability to move the pallet with the plants. How To Build A Vertical Garden Pyramid Tower For Your Next DIY Outdoor Project. Having the correct planting space is usually a problem when trying to plan your new garden layout.
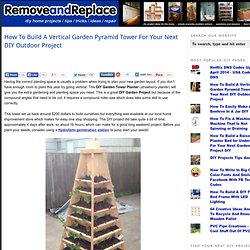
If you don’t have enough room to plant this year try going vertical. This DIY Garden Tower Planter (strawberry planter) will give you the extra gardening and planting space you need. This is a great DIY Garden Project but because of the compound angles that need to be cut, it requires a compound miter saw which does take some skill to use correctly. This tower set us back around $200 dollars to build ourselves but everything was available at our local home improvement store which makes for easy one stop shopping.
Simple Ear Cuff Tutorial. What you've all be waiting for... an ear cuff tutorial!
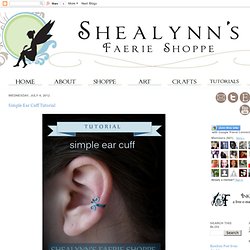
I've been making ear cuffs for over a year, but unfortunately haven't had the time to make some of the insanely complicated designs I've dreamed up. This, however, is a very simple ear cuff that takes only a few minutes to master! Ear cuffs (also known as ear clips, cartiliage cuffs, ear vines, and more) are fabulous for people who don't have pierced ears-- or pair them with other earrings for a "double piercing" look. They are easy to wear, and stay in! I wore one on several rollercoasters and it stayed in place. All you need is pliers and some wire (the pictured wires are 20ga blue silver plated copper and 20ga enameled copper in various colors).
Begin with 3 inches of wire. Fold at one inch. Fold again, creating a little zigzag. Twist the ends into swirls and pinch the swirls until they touch the center wire. You will need a mandel to form the ear cuff correctly. Push the ends down... The tips of the ends will still be straight. Paper Bead Tutorial & mad mim - Sewing and other craftiness from Miriam Tribe. One time I was seriously considering buying a pair of sandals because they were offering a free bonus paper bead necklace.
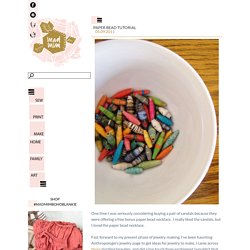
I really liked the sandals, but I loved the paper bead necklace. Fast forward to my present phase of jewelry-making. I’ve been haunting Anthropologie’s jewelry page to get ideas for jewelry to make. I came across these dazzling beauties, and did a toe touch from excitement (wouldn’t that be awesome?!) I set my heart on them (stay tuned for a knock-off post/tutorial on those!) What you’ll need: -magazines, colored paper, tissue paper, toilet paper (ok, maybe not) but really.
-Elmer’s glue, Modge podge, and some kind of varnish. -scissors, or a rotary blade, quilting ruler and cutting mat (way faster) -round toothpicks -something to stick your toothpicks in like a styrofoam tray or packing materials, or cardboard box. How To Make Wire Cages For Round Beads « This Year's Dozen. Cupcakes de Manzana y Canela.
Tengo que confesar que las manzanas por si solas no es una de mis frutas favoritas, pero hecha al horno, en ensaladas, o en cualquier postre me encanta.Llevaba ya varios intentos de adaptar una antigua receta que tengo de un bizcocho con manzana y canela, pero al final, y como vengo haciendo desde que me compré unas revistas de Squires Kitchen, he adaptado esta para el bizcocho de estos cupcakes.

Espero que os guste! Ingredientes para 8 cupcakes: 125g de mantequilla a temperatura ambiente y sin sal150g de azúcar moreno2 cucharadita de extracto de vainilla2 huevos L125g de harina con levadura1/2 cucharada de canela1 manzana grande Precalentamos el horno a 170º y preparamos la bandeja con las cápsulas. Pelamos y cortamos la manzana a daditos. Mezclamos la mantequilla, el azúcar y el extracto de vainilla hasta que estén todos los ingredientes integrados. Batimos los huevos y los añadimos gradualmente. How to Make Beautiful Beads From Recycled Newspaper - A Storybook Life. I love finding ways to turn everyday common items, which would otherwise go into the garbage, into beautiful items that everyone can enjoy!
So… when I came across a gal who was making beautiful beads from recycled newspaper, I had to share the idea with you! When I saw Helen’s beautiful beads, I asked her if she would mind sharing how she made them. After hearing from her, I realized that the methods used for these beads, were the exact same methods that I have used for several different projects including; costumes, handcrafted paper, and sculpted home decor items. I think what I love about her beads though… is the natural earthy look that they have. Please click on the pictures & visit Helen at her Flickr space! How to Make a Fork Bracelet. DIY Apartment Decor: Wall Art.