
A Charming Bedroom Makeover. Pillows. Enamel Painted Bottle Vases. Crafting is near and dear to my heart and I realize that it is shamefully under represented here at The Apple Crate.
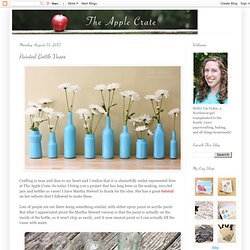
So today I bring you a project that has long been in the making, recycled jars and bottles as vases! I have Martha Stewart to thank for the idea. She has a great tutorial on her website that I followed to make these. Lots of people are out there doing something similar, with either spray paint or acrylic paint. But what I appreciated about the Martha Stewart version is that the paint is actually on the inside of the bottle, so it won't chip as easily, and it uses enamel paint so I can actually fill the vases with water. I started out by collecting old bottles and jars; things I went through in the kitchen and saved rather than recycled. The hardest part of this was actually cleaning all of the labels and sticky residue off! The tutorial was a little vague on what kind of paint to use.
And here are my lovely jars and bottles! Mason Blue Glass Canning Jar. These jars take their name from John Landis Mason.
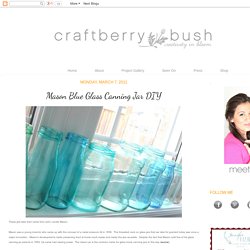
Mason was a young inventor who came up with the concept of a metal screw-on lid in 1858. The threaded neck on glass jars that we take for granted today was once a major innovation. Mason's developments made preserving food at home much easier and made the jars reusable. Despite the fact that Mason sold five of his glass canning jar patents in 1859, his name had staying power. The mason jar is the common name for glass home canning jars to this day (source). In the spirit of optimism let's start with the good news...
The jars, in my humble yet clearly biased opinion, turned out pretty fantastic. I like the contrast of the yellow flowers... ...and the rustic feel of the cement wall behind them. I decided to make some light shades and some darker ones. I had painted and aged this little stool last summer. Take a look at the darker bottle on the right. You will need: Clean jar Mode Podge or White Elmers' gluePaint Brush Food colouringPatience Lucy. Tinted Mason Jars in Rainbow. I love using mason jars for decorating and a seemingly endless supply of craft projects. But rainbow tinted mason jars, just like the vintage ones you can never find anymore? This one might be my favorite project with mason jars yet! Mason Jars Mod Podge in Gloss (buy it here) Food coloring Ramekins to mix colors Newspaper or paper bag Mix food coloring with a T or so of water into individual ramekins.
You can do any color combination you like. Add a couple T of mod podge into your mason jar Add one ramekin of color into the jar and stir to incorporate it all together With a bowl underneath, carefully twist the jar around coating the whole inside with the mod podge/food coloring mixture. Let dry upside down on the paper Do the same with the other colors. Place the jars face down on top of wax paper and a cookie sheet into an oven, set on warm.
When they're ready, they'll look clear and the mixture should lose most of its streaks. Glass Magnet Tutorial. Lace and Doilies. Hi everyone!
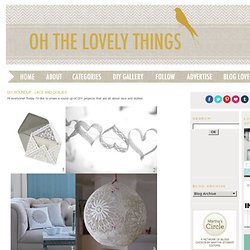
Today I'd like to share a round up of DIY projects that are all about lace and doilies. 1. DIY Lace Paper Enveloppe - Tutorial here 2. DIY Lace Hearts Garland - Tutorial here. Paper Covered Switch Plate. I’ve been working on revamping my powder room. New paint, some new art on the walls, it was all coming together. When Wendy released her Fleury kit this past month, I was seriously swooning! The colors were perfect for this room and I had to figure out a fun way to incorporate my favorite paper from that awesome kit. And then a light came on (pun somewhat intended!) – - switch plate covers! Switch plate covers are such a neat, unexpected way to add a bit of personality to your room.
You’re going to need: Fleury Kit by Wendy Page (or digital kit of your choice)Mod Podge (I used Glossy)pencilcutting mat & exacto knife (and/or sharp pointed scissors - I love my CutterBee scissors!) 1. 2. 3. 4. Note: You may want to lightly sand your switch plate here.