
Envelope Book. A Basic Envelope Book Materials Needed: To create a basic envelope book you will need: 4 envelopes all the same size2 pieces of plain cardstock cut to the same size as the envelopesPatterned scrapbook papers to cover the cardA piece of cardstock as wide as the envelopes and 12" longA length of ribbon Cover the plain cardstock with the patterned scrapbook paper, snipping the corners to get a neater finish.
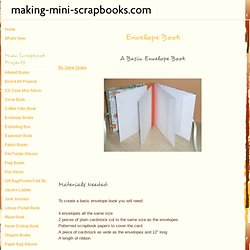
Fold the long piece of cardstock accordion style. Lay the ribbon across the centre of both covers, tape down to stabilize if necessary and glue the spine in place. Cover the inside front cover with patterned scrapbook paper and an envelope to the back cover. It's up to you whether to cut the flaps off or leave them on -- either way looks good. Clothes pin magnets. As a little gift to the girls that attended the dress making brunch (previous post), I made them each a set of clothes pin magnets.
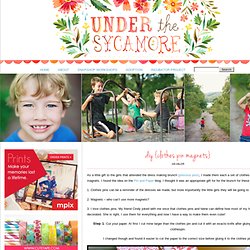
I found the idea on the Pin and Paper blog. I thought it was an appropriate gift for for the brunch for these reasons: 1. Clothes pins can be a reminder of the dresses we made, but more importantly the little girls they will be going to 2. 3. Step 1: Cut your paper. I changed though and found it easier to cut the paper to the correct size before gluing it to the clothes pin. Step 2: Glue paper to pin using Mod Podge. After dry, put another coat of Mod Podge on top of the paper Step 3: In a well ventilated area attach magnets to the clothes pins using E6000 or another strong adhesive.
The Final Product If you aren’t a DIYer or just don’t have the time to make them, you can purchase sets from Pin & Paper’s etsy site. Crea tus propias plantas de Aspirinas - HiperMegaRed Blog. Aunque suene algo irreal si es posible desde cierto punto de vista, todo tiene que ver con cierto proceso de nombre Cristalización que he de explicar mas adelante.
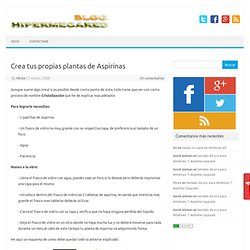
Para lograrlo necesitas: - 2 pastillas de Aspirina. - Un frasco de vidrio no muy grande con su respectiva tapa, de preferencia al tamaño de un foco. - Agua. - Paciencia. Manos a la obra: - Llena el frasco de vidrio con agua, puedes usar un foco si lo deseas pero deberás improvisar una tapa para el mismo. - Introduce dentro del frasco de vidrio las 2 tabletas de aspirina, recuerda que mientras mas grande el frasco mas tabletas deberás utilizar. - Cierra el frasco de vidrio con su tapa y verifica que no haya ninguna perdida del liquido. - Deja el frasco de vidrio en un sitio donde no haya mucha luz y no deberá moverse para nada durante un mes, al cabo de este tiempo tu planta de Aspirina ira adquiriendo forma.
He aquí un esquema de como debe quedar todo lo anterior explicado: The Lazy Lady’s Guide to DIY: Hanging Herb Garden. At some point near the middle of March, I always decide that I’m “done” with winter.

The sweaters and jackets get pushed to the back of the closet, the flip flops come out, and I inevitably freeze my butt off for several weeks until the weather catches up with my warm-weather state of mind. Likewise, my cravings for fresh herbs and veggies are always a little ahead of the season. Growing your own herbs is a great way to save money and avoid buying too much at a time and letting most of it go to waste. If it’s still too cold to plant outside where you are (or if you’re short on space!) This hanging herb garden is the perfect project to get you in gear for spring. What you’ll need: Tin containers with snap-on plastic lids (tea, cocoa, and coffee cans are a good bet), coat hangers, pliers, scissors, herbs (I bought basil, rosemary, dill, and cilantro for about $2.50 each), masking tape, coffee filters, a nail, a hammer, X-acto knife, scrap fabric or paper, and glue or spray adhesive.