
{every}nothing wonderful: Tutorial: Repurposed Envelopes (From Magazines to Mailing) Note: If you like this idea, be sure to check out how to make paper ruffles to add to your envelopes!
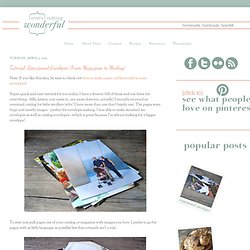
Super quick and easy tutorial for you today. I have a drawer full of these and use them for everything - bills, letters, you name it...my mom does too, actually! I recently received an oversized catalog for baby strollers (why? I have more than one that I barely use). The pages were huge and mostly images - perfect for envelope making. To start just pull pages out of your catalog or magazine with images you love. Other supplies you'll need: Pencil Glue - glue stick or craft glue - whichever you prefer Old envelope or envelope template.
If this is a project you see yourself recreating in the future or with other papers you could invest in an envelope template kit, or you can print templates (you'll need to print at 100% on a larger format printer) from Designer's Toolbox on a heavy stock (mount to board for a longer lasting template). Next, cut out along the lines. Happy re-purposing! Magic Boxes: A Life As Lou Online Class. Due to popular demand, I am doing a tutorial on the Magic Boxes I showed off in some previous posts. To begin, choose your paper. You need six sheets of matching paper (preferably a heavier weight). Choose one for your outside, budgeting for a contrasting one for your lid, and 4 to create the inside boxes. Cut as follows (all measurement are in inches): Outside: 6 x 11 3/4ths Lid: 8.5 x 8.5 4 inner boxes: 8 x 8 The only challenging part of this project is creating the lid and inside compartments. 1. 2. fold the tips of your paper in so that they meet at the center.
Fold in all four sides, and then unfold. 3. This fold gives you the sides of your box. Home page. DIY Project: Chocolate Covered Pretzels. I love this next project a lot.

Probably too much. Chocolate covered pretzles are such yumminess, you can rest assured that your guests will definitely devour your hard work! Here is the breakdown… From Rachelle, the cute bride… My wedding was last weekend, so what better timing than to submit the favors that I actually made for my guests. Materials ( from local grocer) 10 oz. bags of Pretzel Rods (plan to get about 20 per bag, which allows for broken/unusable ones) 12 oz. bag of Nestle semi-sweet chocolate chips or melting bark (1 bag will cover three-fourths of about 40 pretzels) 12 oz. bag of Nestle white-chocolate chips Shortening wax paper Optional: sugar crystals, chopped nuts, flaked coconut, or sprinkles can be substituted to coordinate with your affair Materials (from craft store like Michael’s) Notes and Instructions I first used Microsoft Publisher to design and personalize our favor tags.
Let pretzels dry overnight and place in your cellophane bags.