
Free Pattern & Tutorial at CraftPassion.com - Part 4. Polly's Picks: 45 BEST Charming Lifestyle DIY & Tutorials EVER - Mrs. Polly Rogers. I’ve scoured the world to find and bring you these wonderful projects.

Click on the links to get the tutorials. Enjoy! 46 Awesome String-Light DIYs For Any Occasion. D.I.Y Inspiration from ScrapHacker.com. Free flyin’ feather D.I.Y Posted by ScrapHacker.com on oktober 16, 2012 · Leave a Comment I’ve been experiencing somewhat of a writers block lately, meaning no posts on the blog for a while.

However, I’ve been pinning daily doses of D.I.Y onto Pinterest and Facebook, so make sure to connect over there to stay tuned! Anyways, what better way to celebrate ridding the shackles of writers block than with some [...] Itchin’ to be stitchin’ Posted by ScrapHacker.com on september 19, 2012 · 1 Comment Oh boy have I gotten the itch for cross stitch! The great DI(-Y)VIDE Posted by ScrapHacker.com on september 18, 2012 · 3 Comments I gotta tell y’all, the D.I.Y blogosphere is indeed where the magic happens! Hacky Hanger D.I.Y Posted by ScrapHacker.com on september 7, 2012 · 4 Comments Coat hangers are super easy to come by, you’ve probably got a bunch of old ones stacked at the back of your closet or in a dusty box in the attic, am I right?
PHOTOS: Stunning Mason Jar Crafts. Craft DIY Projects, Patterns, How-tos, Fashion, Recipes @ Craftzine.com - Felting, Sewing, Knitting, Crocheting, Home & More. Most gawked all-time. Guest blogger - Sasha from The Guilded Bee: Here's another DIY project from our sweet friend, Sasha - from the The Gilded Bee.
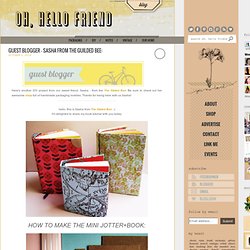
Be sure to check out her awesome shop full of handmade packaging lovelies. Thanks for being here with us Sasha! I'm delighted to share my book tutorial with you today: Supplies you’ll need to make this project: • One—8.5 x 5.5 sheet of cardstock • One---1/2 x 3 inch piece of cardstock or paper • Two---2 5/8 x 3 1/8 inch pieces of cardboard, chipboard or matboard (not corrugated) • Hot glue gun and glue sticks • 25---3 x 5 inch ruled or blank index cards • Two---3 x 5 inch sheets cardstock • 2 rubber bands • Pencil • ¼ inch wide Ribbon: One-6 inch piece, plus two-1 inch pieces To make the page block: * 1.
. * 2. . * 3. . * 4. . * 5. . * 6. To make the cover: * 1. Make a little mark at the center of each side of your paper (4.25 inches on center). On each side of those center marks, draw three lines paralleling each other (6 lines total): 5/16”, 5/8”, 13/16” inch from the center mark. Build a Rustic Wooden Coffee Table (from Scratch!) » Man Made DIY. I know, I know.

Your $20 Ikea coffee table is fine. But, the thing is, I'm old now. I just turned 32, and 32-year olds have beautifully crafted, handmade, coffee tables. I think it's something we're legally compelled to do. Look it up on Wikipedia. To start out our project, we needed some pretty wood to form the top and second shelf of the table. Next, we needed the rest of the crap to put it all together.
We went to Lowes. We picked up four 1" pipes, four hose clamp/carbon screws, four 1" pipe flanges, four 1" pipe connectors, a 4' piece of pine, polyurethane clear coat, and a 1" drill bit to drill the holes for the second shelf. So, the first thing we did was pick which three boards were the top (The pretty ones) and which were the second shelf. Once the boards were nailed in, I drilled out holes and mounted the flanges. Next I took two tiny strips of wood from an old Ikea butcher block/cart and used those to mount the second shelf.
Lastly we finished the table top. Boom!