
5-Minute Hairstyle Video Tutorials. South Shore Decorating Blog. Sea of Shoes: HAIR HOW-TO. I am sometimes asked how I style my hair, and while my method is far from perfect, I thought I'd show you how!
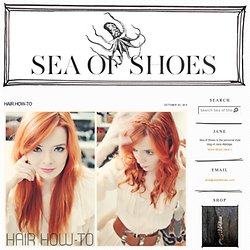
My hair is pretty straight and fine naturally and I always let it air dry. Since I go about three days between washes, I like to curl it on the first day and let it mellow out into some nice waves over the next two. Let's get started! Messy bun tutorial. (Coat by French Connection) After this post, I got a few requests for a “messy bun” hair tutorial! My boyfriend laughed when I told him that I needed help photographing it. It is a bit unintuitive – a process for making your hair “messier.” That said, this method will probably have to be tailored to fit your individual hair type; it even took me a few tries to photograph and post this tutorial properly, as sometimes it turns out better than others.
Nonetheless, I thought I’d oblige those who asked! (Crew neck sweater by J.Crew) FYI, this hairstyle is considerably more difficult on freshly-cleaned, slick hair – it’s much easier to style if it’s a little dirty. Twisted pony. » Dear Emmie. Www.runningonhappiness.com/2011/09/how-to-top-knot.html. The top knot, or messy bun, is a great hair style when you don't have a lot of time, but want some style, and it always looks classic.
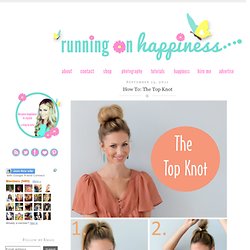
It works best for the gals with longer hair, but shorter haired gals, need not to worry. Beauty. Sometimes I need a little "makeup pick me up" about 3/4 of the way through the day.
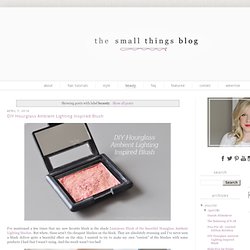
If I have something going on in the evening, and I've had a particularly busy day, it helps me feel a little fresher to touch up a few areas of my makeup before I go out for the evening. I don't want to, or need to, redo every part of my makeup, so I pick a few areas that are going to have the most impact on how fresh my makeup will look. 1. Swirl a brush in a little illuminizer and apply to cheeks. Dust whatever remains on the rest of your face. 2. 3. 4. As far as makeup brushes go, these would be great little travel brushes.
The nicest things about these little makeup touch ups? Winter hair how to: the double knot} . . . have had this fun tutorial planned for well over a week now, as a follow-up to the ultra-chic and wildly popular side chignon, {which some of you had great success with}, but in all this week’s excitement, hadn’t a chance to post until now . . . perfect for unruly winter hair, this look is a beautiful, more casual alternative to the sleek classic chignon and goes easily from a day at the office to dinner reservations at seven . . .
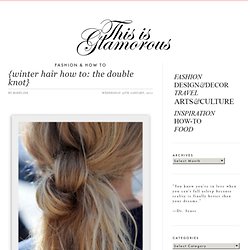
{step one} to ensure that your hair has enough texture for the hairstyle to hold, use a spray-in mousse applied to the roots and work through with a hair dryer; if you have flat or fine hair, simply apply more mousse {step two} using a comb, divide hair down the center, beginning at the crown of the head and finishing at the nape of the neck. Three twisted buns. I'm excited to share another hair tutorial!
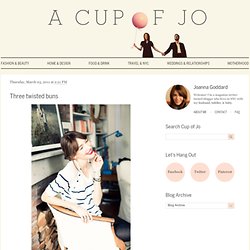
You know those days when you want your hair to look pretty but you only have a minute? Well, my friend Caroline swears by this gorgeous set of three twisted buns ("like cinnamon rolls! " she says). So she came over to explain exactly how to do them, and the wonderful Jamie Beck took a few photographs. And guess what? Here are Caroline's steps, if you'd like to try them out... A DO. FOR YOU. Photo: angela+ithyle/thebeautydepartment.com post designed by kristin ess Some days you just don’t wanna.

For those days, we made you this! Seems like we’ve been seeing pictures of this lovely look everywhere. It’s definitely an easy, gorgeous spring/summer ‘do. A Beautiful Mess. I love using cloth napkins to dress up our dinner table, and through the years I've grown even more fond of their sustainability and cost effectiveness.

Though, I'm not sure how cost effective it is if you keep buying more and more cloth napkins each year! This holiday season I thought it would be fun to look at how I could dress up the napkins I already own to give them an extra festive vibe. Check out three simple ways you can give new life to your table linens. And hey! Two of them are even no sew! Ribbon Trimmed Napkin This look is so (no sew) simple! Supplies:-ribbon-heat bond in width of ribbon-cloth napkin (buy mine here)-iron-fabric scissors (not shown above) Step One: Trim pieces of your ribbon to be about 1.5 inches longer than the width of your napkins. Step Two: Fold down the edges of each ribbon segment about 1/4" and iron flat. Step Three: Iron the heat bond to the ribbon (pressing with hot iron for two seconds), then peel off the paper backing. Pom-Pom Trimmed Napkin.