
Antique Stereo Cabinet - Before & After. * There are affiliate links within this post * I’m sure many of you belong to one (or if you’re me, twenty) Facebook “garage sale” groups.
Or you check out Craigslist regularly. Or you go garage sale/estate sale shopping. Or you go curb shopping. Vertical Storage From Old Dresser Drawers. By Becky Striepe on January 7, 2014 If you live in a small space, storage is at a premium.
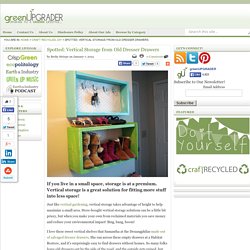
Vertical storage is a great solution for fitting more stuff into less space! Just like vertical gardening, vertical storage takes advantage of height to help maximize a small area. Store-bought vertical storage solutions can be a little bit pricey, but when you make your own from reclaimed materials you save money and reduce your environmental impact! Bing, bang, boom! I love these sweet vertical shelves that Samantha at the Douangphilas made out of salvaged dresser drawers. Keep an eye out for dilapidated old furniture, because even if you can't salvage the whole thing, this tutorial shows that you can even use parts to make something wonderful.
How to Upgrade your Builder Grade Mirror - Frame it! I love framed mirrors in the bathroom but I really don't like the idea of ripping out a large builder mirror to replace it with a smaller framed one.
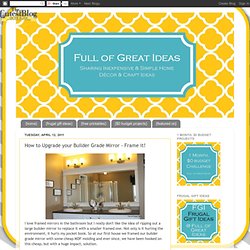
Not only is it hurting the environment, it hurts my pocket book. So at our first house we framed our builder grade mirror with some cheap MDF molding and ever since, we have been hooked on this cheap, but with a huge impact, solution. I saw on Our Suburban Cottage, over a year ago, an amazing mirror that she created in her bathroom. Using her design, my husband was able to create this stunning addition to our master bathroom's mini-reno. I fully intend to redo everything out of this bathroom when time and money permits; but for now we had to do cosmetic changes that have made this bathroom livable for a few years. We did two bathrooms with this type of frame. Before (when we bought the house): After (after some minor and inexpensive changes): Method: Paint all the trim both back and front. KMS Woodworks' Profile. Overview: Originally from Michigan, I moved to Colorado in 1991 to be closer to the mountains I love.
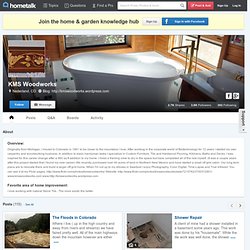
After working in the corporate world of Biotechnology for 12 years I started my own carpentry and woodworking business. In addition to basic handyman tasks I specialize in Custom Furniture, Tile and Hardwood Flooring, Kitchens, Baths and Decks. I was inspired for this career change after a 960 sq ft addition to my home. I hired a framing crew to dry in the space but have completed all of the rest myself. Favorite area of home improvement: Tiny Polaroid Magnets. Hi there!
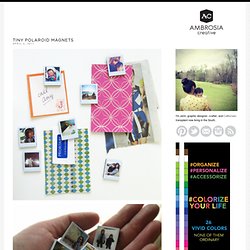
It’s felt like forever since I’ve last blogged, and has felt like an eternity since I’ve done anything crafty and nifty. Since my morning sickness has gone into full speed (yes, we’re expecting our third this fall!) I haven’t felt like myself. But nothing like inspiration to wake one out of a reverie — or nightmare, in my constantly sick state. I came across these DIY Pantone chip magnets on How About Orange and wanted to do something similar. You will need: Cardboard (mine was the backing of a sketchbook — much thicker than the back of a regular spiral bound notebook) or 2-3 sheets of white cardstock or poster board spray-mounted together to use as a sturdy backing to the magnetsOpaque white marker (necessary only if your cardboard is not white) Craft knife Metal straight edge/ruler Clear packing tape or frisk film. Step 1: Download a Photoshop file of the Polaroid frames below. Step 2: Print out photos onto photo paper. Step 4: Trim out photos with craft knife. 487 Comments. Easy and Affordable Rental DIYs.
My DIY Project. My DIY Project2. Four DIY Projects. DIY/ Towel Bar..etc. Second Chance to Dream: Recycle Project: Pop Cans turned Garden Art. Hi Everyone!

With Earth day one week away I have a super fun recycling project to share with you. It's Garden Art from Pop Cans or Soda Cans as some might say. I LOVE, LOVE, LOVE gardening. I LOVE spring, the new life spring brings. Gardening gives me an excuse to get out there and enjoy this new season. You'll need to gather your supplies. Easy, frugal DIY towel bar: aka, The best towel bar in the whole wide world of history. When my daughter was a little girl, her way of saying something was the most awesome thing possible was to declare it “the best ___ in the whole wide world of history.”
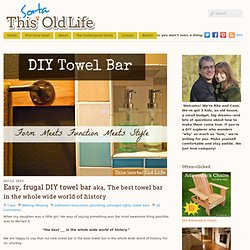
We are happy to say that our new towel bar is the best towel bar in the whole wide world of history. For us, anyway. It’s turned out to be one of my favorite parts of the renovated bathroom. It’s frugal and green, it functions exactly the way we wanted it to, and it’s pretty stylish (we think). First, the function: (because function is always first) More than anything, Rita and I wanted a towel bar that would hold all the towels we wanted without any doubling-up or fussy folding. It’s super-sturdy ,and despite the long stretch between ends it doesn’t flex or dip a bit.