
Fabric KeyChains. Ever dig into the depths of your purse trying to find your car keys, while simultaneously juggling groceries and a wiggly toddler?

Well I have. One too many times. Today I would love to share with you how to make these fabric keychains that can be worn around your wrist for easy access. Let’s get started. For this project you will need: 2 coordinating fabrics1 strip of fusible interfacing (I used Pellon 809 DecorBond)1 purse strap clip (I found mine at JoAnn’s Crafts)4 inches ribbon (mine was 7/8 inch width)matching thread First, cut your fabric so that you have a strip of each material that measures 2.75 (2 and 3/4) inches by 13 inches. Iron both strips of coordinating fabrics a 1/4 of an inch down both sides with the right-side of the fabric face down on your ironing board.
I use a piece of card stock paper to fold the material over to give me a nice even hem line. When both fabrics have been ironed, fold the material in half length-wise and iron. Iron these together. Crafts / This is how you create a Teddy Bear from a sock. RAWR Creatures: HOW TO MAKE A SOCK TEDDY BEAR. Hi!
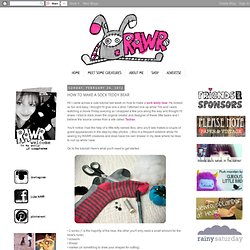
I came across a cute tutorial last week on how to make a sock teddy bear. He looked so fun and easy, I thought I'd give one a shot. I stitched one up while Tim and I were watching a movie Friday evening so I snapped a few pics along the way and thought I'd share. I tried to track down the original creator and designer of these little bears and I believe the source comes from a site called Taobao. You'll notice I had the help of a little kitty named Boo, who you'll see makes a couple of guest appearances in the step-by-step photos. :) Boo is a frequent sidekick while I'm sewing my RAWR creatures and does have his own drawer in my desk where he likes to curl up while I sew. On to the tutorial! • 2 socks (1 is the majority of the bear, the other you'll only need a small amount for the bear's nose) • scissors • thread • marker (or something to draw your shapes for cutting) • stuffing • needle, stick pins • kitty foot on the left hand side of the photo is optional.
On to the fun part! 1. 2. 3. Single Sock Dino Tutorial. Thank you to all the people who requested this tutorial, your encouragement made it happen!
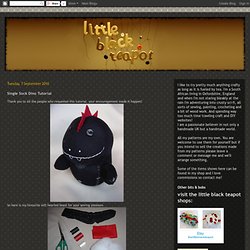
So here is my favourite soft hearted beast for your sewing pleasure. To begin we need to gather supplies:A pair of scissorsA sock (This one is a bit thread bare and woolly and needs a new lease on life)Some red (or, really, any colour) felt2 buttons for eyesSome coloured thread for sewing together and making his faceSome filling ( I used standard fibre fill, but even scraps of fabric would do)Firstly, we need to cut the sock: In this pattern the heel of the sock becomes his nose/face/muzzle (what is appropriate for a T-Rex?) The part towards the toe of the sock is going to be the top of his head and the part towards the ankle is his body. The body part is about twice as long as the head part but don't be too worried about measurements etc.
WHIMSY LOFT. This is a very simple Tutorial to make a Sock Owl.

I’m using the leggings sock… the one that goes from your ankle up to your knees. See photos below from left to right. Measure 5″ from the rubber and cut. We only need this part, the rest can be kept for other toys ;-). Turn the sock around and sew a straight line on the rubber part. Ones done, go to the other side (where we cut just now), and fold the opening into 3 section like the photos. Sock Animals: Free Patterns & Tutorials for Sock Monkeys, Puppy's, Pigs & More. Sock Elephant Sewing Pattern. Instructions: Cut 3-1/2 inches off rib of sock. Starting 3 inches from the heel, sew a 1/8 inch seam on each side of the center line and across the end of the ribbing. Cut the sock between the seams and about 1-1/2 inches farther to make an opening for the stuffing. Turn sock right side out. Head and Body: To shape the head, stuff foot of sock nice and plump and tie off loosely at the neck with ribbon.
Legs: Cut the second sock as shown, about 5 inches long. Mouth: Cut off complete heel from the second sock. Trunk: Open flat strip of sock so it is about 1 inch wide at one end and 6 inches at the other. Ears: For each ear, cut two pieces in the shape of the ears. Eyes: Sew on moving eyes, buttons (my personal favorite), felt, or embroider with black thread. Tail: Make a short roll of the material and sew into place. Trim: Trim is optional.