
Project Run and Play: Flicker Friends Guest Post: Harmony from Sew in Harmony. Hi, everyone! My name is Harmony and I have been blogging over at Sew in Harmony since last fall. I am a wife and a mommy (to two precious but BUSY girls) and I also work at our church part time coordinating our children’s ministry. Sometimes I sleep, but I rarely clean anything…that’s how I get it all done! I am ecstatic to be guest posting here at Project Run & Play! I have been following along since Season 2, but this past season was my first season to SEW along.
Materials Fabric (about 3/4 yard) Matching thread Coordinating Piping (optional) Math (All the math in sewing! Make Ruffles Round off the ends of each ruffle piece. Make Straps Fold strap pieces in half lengthwise and press. Make Bands Sew back pieces to front pieces along short edges for both outside and facing. Attach Straps Safety pin straps to facing wrong side to right side in the location you want them…I angled them in just a bit in the back. Finish Band Place facing and outside bands right sides together. Tutorial. It's a beautiful spring day today in Utah. Unlike a few days ago when I was sewing these little shorts together and it looked like this outside my sewing room window... So please forgive my terribly dark pictures in my tutorial. Basically I used the same method as I used with my Pajama pants tutoral . For the Peter Pan collar on the little t-shirt I used THIS tutorial. My origional project was to just add the collar to the t-shirt and be done.
Instead of using a pair of pajama pants for my template I used a pair of shorts that fit my daughter well and cut a couple pockets from the left over collar fabric. Sew your shorts together using the same method as THESE super simple pajama pants. To make the pocket I just cut two pieces in the shape I wanted my pockets to be and sewed the two together, right side together. Tutorials - Sew Like My Mom.
Jelly Roll Baby Quilt Tutorial. I had a few friends around yesterday for a bit of a quilting/sewing day.

I started on another baby quilt. This time using the jelly roll that I got from Green Fairy Quilts. The idea was to use 16 different strips and path them together into colourful blocks. But if you look closely, you can see that there are 4 squares that are not from the Punctuation range, they are from an older Moda range called Breath of Avignon. Sew BitterSweet Designs. How do you make Flying Geese?

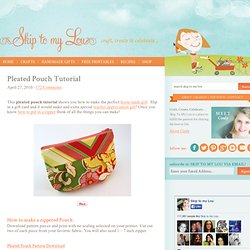
Do you use the no waste method that involves cutting squares and sewing them to each other as seen on this PDF? I recently bought a new toy that has made flying geese so much easier for me, the Easy Star & Geese Ruler. Pleated Zippered Pouch Tutorial. This pleated pouch tutorial shows you how to make the perfect home made gift.

Slip in a gift card and it would make and extra special teacher appreciation gift! Once you know how to put in a zipper think of all the things you can make! Download pattern pieces and print with no scaling selected on your printer. Cut out two of each piece from your favorite fabric. You will also need 1 – 7 inch zipper. Pleated Pouch Pattern Download Mark fabric from pattern where it should be pleated. Place outer top piece face down on pleated piece, line up edges and stitch across 1/4 inch from the edge. Make a zipper sandwich. With a zipper foot sew across the top between the edge of your zipper sandwich and the zipper teeth (closer to the zipper feet). Bring lining and outer fabric to the same side. Make another zipper sandwich on the other side of the zipper. Open up and it will look like this.
Bring both pieces of lining to one side and both pieces of the outer fabric to the other side. Baby home made / Día tras día. Inspirations #02. Profitons des beaux jours !

Pour un joli blondinet qui n'était qu'une adorable crevette capable de tenir dans mon coussin fleur lors des prises de vues dédiées au livre et pour sa maman qui, ce jour-là, affairée à nous faire respecter un timing plutôt serré, avait littéralement fondu pour le modèle original du tapis baluchon... J'ai réitéré l'opération en y apportant quelques modifications de saison et en coordonnant son graphisme à celui de son petit plaid. Un tapis illustré de mes petites bouilles fétiches, molletonné et doublé d'une 1ère face en coton et d'une 2d face amovible en toile enduite, pour lui permettre de l'utiliser indifféremment à l'intérieur comme à l'extérieur. Adaptation libre du modèle Tapis baluchon p 54Création issue du livre : "Tout un monde en couture pour nos petits lutins" Tissus à pois majoritaires : Mondial TissusTissus unis : Magasin localTissus fantaisie prune : Equilter.
Mini-couverture Express. Mini-couverture molletonnée 60 X 80 cmPolaire double épaisseur "Vieux Rose" et tissus coton:Motif personnel (pois framboise & fleurs), mondial tissu 2011 (rayures & pois rose) & 2010 (pois multicolores)Cotton & Color 2010 (vert d'eau)
