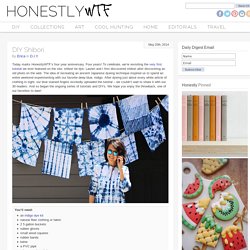

DIY Ombré Denim. Dip dyed ombré denim has been popping up here and there and not only do we love the look, it’s super easy to do yourself! We’ve combined Tory Burch‘s dip dyed jeans and Miss Unkon‘s ombré 501s as inspiration for a pink infused DIY that could be done in a jiffy. DIY Shibori. Today marks HonestlyWTF’s four year anniversary.

Four years! To celebrate, we’re revisiting the very first tutorial we ever featured on the site: shibori tie dye. Lauren and I first discovered shibori after discovering an old photo on the web. The idea of recreating an ancient Japanese dyeing technique inspired us to spend an entire weekend experimenting with our favorite deep blue, indigo. After dyeing just about every white article of clothing in sight, our blue stained fingers excitedly uploaded the tutorial – we couldn’t wait to share it with our 30 readers. You’ll need:an indigo dye kitnatural fiber clothing or fabric2 5 gallon bucketsrubber glovessmall wood squaresrubber bandstwinea PVC pipea long wooden sticka drop clothrubber glovesscissors When choosing fabric or clothing, it’s important that made of natural fibers.
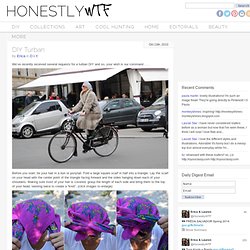
Itajime shibori is known as the shape-resist technique. Fold it again in the other direction – again, like an accordion. Wrap the twine around the fabric. DIY Turban. We’ve recently received several requests for a turban DIY and so, your wish is our command . . .

Before you start, tie your hair in a bun or ponytail. Fold a large square scarf in half into a triangle. Lay the scarf on your head with the center point of the triangle facing forward and the sides hanging down each of your shoulders. Making sure most of your hair is covered, grasp the length of each side and bring them to the top of your head, twisting twice to create a “knot”. (click images to enlarge) Once you’ve twisted the ends twice into a knot, bring both sides together to the back of your head and tie it tight. Voila, you’ve just made a turban! (top image from here, rest of images by Honestly…WTF) DIY Bleach Tie Dye. Last summer, we were obsessed with shibori indigo tie dying.

No, really . . . we just about dyed anything white in sight. So when Free People asked us to include a DIY in their guest blogger series, we knew a new tie dye project was absolutely in order. And as the weather is beginning to warm up, what better time than now to start experimenting with reverse tie dye using bleach! Black tees and tops: watch out!
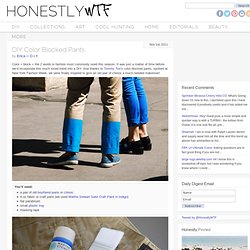
To make a grid-like pattern, fold the shirt like an accordion and bind it between two pieces of wood or other flat shaped objects. Before you start bleaching, make sure you are wearing gloves and working outdoors or in a well ventilated area. The rusty brown color will slowly fade into a beautiful lighter shade as it begins to set. Your reverse bleach tie dye shirt is ready to wear! (top image from here, rest of images by HonestlyWTF) Ira Zvidrina – HowTo Wear (only) Your Boyfriends Shirt. DIY Color Blocked Pants. Color + block = the 2 words in fashion most commonly used this season.

It was just a matter of time before we’d incorporate this much loved trend into a DIY. And thanks to Tommy Ton‘s color blocked pants, spotted at New York Fashion Week, we were finally inspired to give an old pair of chinos a much needed makeover! You’ll need: Depending on the length of the pants, measure 12-16 inches from the bottom hem to the calf. Use a long piece of masking tape to tape off one leg. Start painting, using generous amounts of paint. Once the legs have been painted, allow it to dry completely. DIY Bow Tie. A couple of weeks ago, we celebrated FNO by DIYing bow ties and neckties from scraps of denim at Madewell – because honestly, who isn’t borrowing a bit of inspiration from the boys this season?

Today we’ll be showing you, who may have missed the event, how to DIY a bow tie with luxurious, Dolce & Gabbana-inspired velvet. Before you know it, you’ll be well suited and ready to channel your inner Marlene Dietrich! You’ll need:a 6″ x 3.5″ piece of velveta 0.75″ x 2.5″ piece of velveta 1″ pin backa glue guna rulera pen Start by drawing a vertical line and a horizontal line, dividing the rectangle into 4 equal quarters. Pinch the intersecting lines and pick up the velvet. Flip the piece over, while still pinching the backside, and place a drop of hot glue in the center.
Place another drop of glue on the front side and fold the fabric closed. Turn the bow on its backside and glue the tip of the velvet strip to the center. Glue a pin back to the back of the bow. Your velvet bow tie is finished!