
Andreabastianelli. Homemade Nutella. D.I.Y. Monday: Pinhole Camera How-To [part 2] If you read part 1 of this DIY, you now know what a pinhole camera is!
![D.I.Y. Monday: Pinhole Camera How-To [part 2]](http://cdn.pearltrees.com/s/pic/th/monday-pinhole-beautiful-19122916)
This post is devoted to how to build a pinhole camera from scratch and the next two posts will be decorating your pinhole camera and tips for great pinhole photos. :) YAY! This post is pretty long & technical. if you have any confusion on a certain step, there are tons of other tutorials all over the internet (each one being a little bit different). A huge thank you to my wonderful dad for doing most of this tutorial. He's super amazing at building things, so I was very lucky to have his help. Enjoy! Step 1. Step 2. Step 3. Step 4. Step 5. Here's my shutter.... I used a piece of craft foam and a piece of paper to make my shutter. Step 6. Step 7. 10.) This is how you take a photo! We hope that our tutorial has been helpful to you today!
In Part 3 I'll show you how to paint and decorate your handmade camera with a cute custom strap! Skulls and Ponies: How to make a bowl from a vinyl record. The other day I came home from work to discover a little present from Tom.
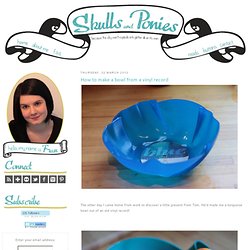
He’d made me a turquoise bowl out of an old vinyl record! I absolutely loved it and begged him to show me how to make one. I thought they looked great – and would make great fruit bowls or bowls to store crafty bits and bobs in – so I persuaded him to help me put together a tutorial for you lovely readers! What you will need: An old vinyl record – perhaps one that is scratched or you can pick one up from a charity shop for next to nothing. Two metal bowls that fit inside each other -your finished vinyl bowl will be roughly the same size as the small bowl A potato masher – or something to hold the vinyl down with A couple of forksA kettleA friend/family member – not essential but useful with the fiddly bits to have a second pair of hands Step 1 Boil the kettle.
IMPORTANT: In this tutorial you will be using boiling water so please please please be very careful and don’t scald yourself! Step 2 Step 3 Step 4. Create a Unique Bowl Using Old Buttons. Got a lot of old buttons laying around the house?
I sure did. So I decided to make a fantastic button bowl using a balloon and glue- I know it sounds crazy but stick with me here! Turn those piles, bags, drawers (I had a lot of buttons too, no judgement) full of old buttons into something beautiful and functional. These bowls are easy to make and the supplies are very cheap. Button bowls would be a fun craft to make with your kids on a rainy day, or as a one-of-a-kind gift for that someone who has it all. :) What you will need: flat buttons of desired colors and sizes (I have found that smaller buttons tend to stick better) balloons white glue- Elmer’s white glue works well, or Tacky glue, anything that dries clear large paint brush scissors news paper cup or can to balance balloon on while it dries (see photos) patience 1. d1y.
Coasters. Chairs, benchs, stools, logs... Dashboard and chalkboard. Bracket and hooks. Sink. Leather sleeves and cases. Lightings. Mosaico.