
Headband Refashion. Our headband had a flower that was starting to look a little tired and worn so we made it new again!

This braided ribbon could embellish many things— a hair clip would be cute too! These headbands would make great handmade gifts for little girls to make each other! Woven Ribbon Headband Gather a headband and about 4 1/2 yards of ribbon. You can use any with — I chose 1/4 inch. Begin by finding the middle of the ribbon. Now bring the bottom ribbon up and make a loop and send it through the beginning loop that you just made by crossing the ribbon. Pull the right side snug. Now repeat for the other side, picking up the right side, making a loop and sending it up through the loop just made on the other side. Headband Makeover {How to Make a Bow} Mrs.
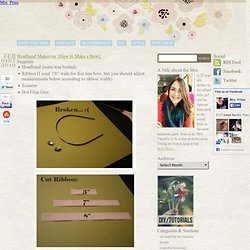
Priss Headband Makeover {How to Make a Bow} Feb01st2010 Supplies: Headband (mine was busted)Ribbon (I used 7/8″ wide for this size bow, but you should adjust measurements below according to ribbon width)ScissorsHot Glue Gun (If you’re wondering, I’m gazing down at my toilet.) Other tutorials: Bib Clips: A Simple DIY for Moms Anthropologie Floral Necklace Anthropologie Bonheur Necklace Tags: bow crafting crafts diy headband tutorial Categories: DIYs and Tutorials Me Being Crafty Personal Related Posts Dainty Flowers for Your Hair – Yeahhh, it’s another tutorial.I came up with these flowers one day when I was in a crafty mood...DIY – Anthropologie Inspired Flag Bunting NecklaceI absolutely love this necklace, but with the $70 price tag I was like, ummmmmm…...Anthropologie Bonheur Necklace TutorialA few months ago (okay, six), I posted a photo of an Anthropologie-inspired necklace I... 50 Comments Thus Far.
DIY TUTORIAL and a giveaway! Happy Monday everyone!
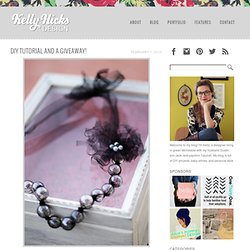
Today I am going to show you how to make this necklace and introduce my first giveaway! Below are the steps to make this tulle necklace. And to win this necklace, just leave me a comment below! A winner will be announced on Friday. Good luck! Step 1: Pick out your fabric and beads. Step 2: Measure the fabric around a bead and then add an inch, this is where you will cut. Step 3: Cut the fabric the long way.
Step 4: You should now have a long strip of fabric. Step 5: Sew the folded fabric at the open end. Step 6: You should now have a tube. Step 7: In order to turn the tube right side out, attach a safety pin to one end. Step 8: Feed the safety pin through the tube. Step 9: Once the tube is right side out, put a bead in the tube and center it. Step 10: Make a knot at each end of the bead. Step 11: Feed another bead into the tube and knot after the bead. Step 12: Sew the ends shut. Step 13: Add flower by gathering strips of the fabric together and sewing the center together.
Glitter Bow Headband Tutorial. I've been going into the hair accessory section of the store lately looking for something new and fun and I fell in love with a really sparkly bow headband.
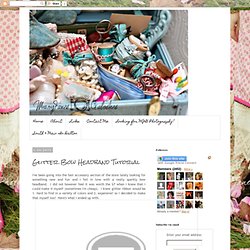
I did not however feel it was worth the $7 when I knew that I could make it myself (sometimes I'm cheap). I knew glitter ribbon would be 1. hard to find in a variety of colors and 2. expensive! So I decided to make that myself too! Here's what I ended up with. What you need- Ribbon (I used 1.5 inch satin ribbon) Spray adhesive Clear fishing line string Headband Hot glue gun Scrap of felt GLITTER! To make my bows lay nice and flat on the band I used a bit of glue to tack the ribbon folded into a bow like position. Just a dab of glue to tack it into place. Shape the bow with your fingers so that the loops are puffed.
Hot glue the bow to your headband. All set. You can see this one needs to be tapped for excess glitter a bit more.