
Art From Everyday Objects: Paperclips + String. So today I thought it would be a fun challenge to work with paperclips.

You can’t get much more mundane than a paperclip! After much thought, I came up with paperclip earrings. If you have paperclips and some pretty cotton string, you can create these beauties. They’d probably look pretty cool as a necklace too. Here is a diagram to show you where to open the paperclip to create this triangular shape. You are basically unbending the clip at all three of the curves. Once you’ve got the triangular shape, you need to glue the ends together. Fig 1: Winding the string around // Fig 2: Starting to wrap the string around the earring, secured with Liquid Stitch. Etched Portion Control Wine Glass. OK, confession: I’m on Weight-Watchers.
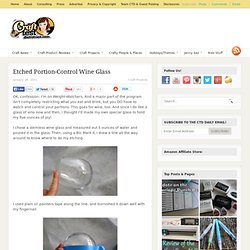
And a major part of the program isn’t completely restricting what you eat and drink, but you DO have to watch and control your portions. This goes for wine, too. And since I do like a glass of vino now and then, I thought I’d made my own special glass to hold my five ounces of joy! I chose a stemless wine glass and measured out 5 ounces of water and poured it in the glass. Then, using a Bic Mark it, I drew a line all the way around to know where to do my etching. I used plain ol’ painters tape along the line, and burnished it down well with my fingernail. I then applied the Armour Etch Cream (see my review of that here) to the bottom of the glass.
Now, you could leave it here and you’d have done the job- now you know just where to fill your glass! I chose the flower head icon of the Songbird Cartridge (using my “j” monogram) for the Cricut and cut it out at 3″, using some craft vinyl. WELL WORN: Faux Real: Luxe Snow Globes. Inspired Entertaining: DIY Chalkboard Wine Glasses.
Last month I got an email from one of those "deal of the day" websites featuring a very cute set of wine glasses with chalkboard stems from a company called Chalkboard China.
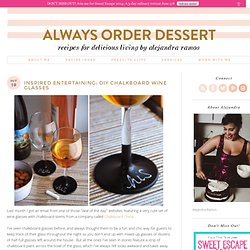
I've seen chalkboard glasses before, and always thought them to be a fun and chic way for guests to keep track of their glass throughout the night so you don't end up with mixed-up glasses or dozens of half-full glasses left around the house. But all the ones I've seen in stores feature a strip of chalkboard paint across the bowl of the glass, which I've always felt looks awkward and takes away from the beauty of the wine or beverage in the glass. What I like about this version is that the writing part is at the bottom on the stem and foot of the glass, so it doesn't compete with the beverage.
I also like that the simple black foot on the glass is in itself an elegant design element, and would work just as well with no writing on it. So I figured, "I can totally make that myself! " Materials 1. 2. 3. Method Step 1. Reusable Lunch Containers. Glass Etching. Have you ever done any glass etching?
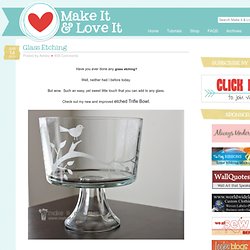
Well, neither had I before today. But wow. Such an easy, yet sweet little touch that you can add to any glass. Check out my new and improved etched Trifle Bowl. The perfect bowl for desserts of all kinds…..and even a great place for fresh fruit on the counter. Glass etching is also a great way to stamp your name on your pyrex dishes, to make sure they come back to you. And how about adding a little extra detail, just because…… (Edited to Add: The font used here is called Smiley Monster and I downloaded the font for free here.) Sweet in every way. Are you wanting to make your own? (This technique permanently etches your glass. First, you’ll need a piece of vinyl with an adhesive back, like the vinyl you buy for vinyl wall decor.
Then peel away the shapes, leaving the negative space all in one piece. The Silhouette code for the bird/branch is: bird_on_branch_C00044_23067 01/18/2010 Then peel the vinyl backing away. See how there are air bubbles? My First Rubber Stamps - IMAGE REPRODUCTION TECHNIQUES. Tiny Polaroid Magnets.
Hi there!
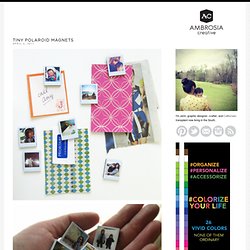
It’s felt like forever since I’ve last blogged, and has felt like an eternity since I’ve done anything crafty and nifty. Since my morning sickness has gone into full speed (yes, we’re expecting our third this fall!) I haven’t felt like myself. But nothing like inspiration to wake one out of a reverie — or nightmare, in my constantly sick state. I came across these DIY Pantone chip magnets on How About Orange and wanted to do something similar. You will need: Cardboard (mine was the backing of a sketchbook — much thicker than the back of a regular spiral bound notebook) or 2-3 sheets of white cardstock or poster board spray-mounted together to use as a sturdy backing to the magnetsOpaque white marker (necessary only if your cardboard is not white) Craft knife Metal straight edge/ruler Clear packing tape or frisk film. Step 1: Download a Photoshop file of the Polaroid frames below. Step 2: Print out photos onto photo paper. Step 4: Trim out photos with craft knife. 487 Comments.
Make a silver ring for 25 cents. How to Make a Wire from a Plastic Bottle: 4 steps (with pictures)