
Dissolved Oxygen Sensor. Looking for a way to detect dissolved oxygen levels?

If you raise fish, this and a ph sensor are two important things to monitor (and of course, temperature), and an Arduino is the ideal platform to build upon. The Sensorex DO1200 ($139) outputs a <1mv - 54 mv signal indicating DO levels. Use analogReference(INTERNAL1V1); //Mega & Mega 2560 or analogReference(INTERNAL); //328p based to set the top of the input range to 1.1v. Connect it to one of your analog pins. So: //GND(black original cable) //A3(red original cable) int analogPin = 3; // sensor+ connected to analog pin 3 int val = 0; // variable to store the value read void setup() { Serial.begin(9600); // setup serial analogReference(INTERNAL1V1); //MEGA 2560 } void loop() { val = analogRead(analogPin); // read the input pin Serial.println(val); // debug value delay(500); }
Playground - Hall Effect. Navigation History 0.1 2010-07-23: Initial page0.2 2010-08-21: added some info0.3 2012-06-10: Fixed incorrect calculation, tidied up code, added further info Description A Hall effect device produces a voltage when placed in a magnetic field.

Here is some simple code to use an A1301 or A1302 Hall effect sensor, which give output proportional to field strength. If there is no magnetic field applied the sensor outputs approximately half of the supply voltage, typically 2.5V, assuming the supply is 5V. These devices come in LH and UA packages; beware that the pinouts depend on the package (see sample code for details). The device has a specific orientation; the magnet should be on the logo side of the device. Note that these sensors are relatively inaccurate (their sensitivity to magnetic field can vary within 20% or so), so there is probably not much point in using a precise 5V voltage reference.
On the other hand, you probably do expect a reading of zero when no magnet is near the device. G3/4 Water Flow sensor [SEN02141B] - $14.90. Is this 3/4" NPT thread?
![G3/4 Water Flow sensor [SEN02141B] - $14.90](http://cdn.pearltrees.com/s/pic/th/sensor-sen02141b-seeedstudio-81491743)
Or not? I saw somewhere that it might be a British thread size, Is that right or is it actually 3/4" NPT? Hi, it is British thread size. Answered by Deray Wu | 2014-03-24 Was this useful? Vinoth kumar | 2013-03-08 Amplitude of the pulse signal Is the amplitude of the pulse signal dependent on the input voltage signal? Hi Vinoth kumar.The amplitude of the pulse signal is dependent on the flow rate. Jacket Chueng | 2013-04-15 Nathan Berzai | 2013-03-04 How would you make it more sensitive?
Reading Water Flow Rate from a flow meter. This is part of a project I have been working on and I thought I would share it here .

The flow meter I am using is the Water Flow Sensor found in the Seeed Studio Depo. It uses a simple rotating wheel that pulses a hall effect sensor. By reading these pulses and implementing a little math, we can read the liquids flow rate accurate to within 3%. The threads are simple G1/2 so finding barbed ends will not be that hard. I found some at lows for $1.89 each. You will need Seeeduino / ArduinoWater Flow Sensor10K resistorWiring up the Water Flow Sensor is pretty simple. Once you have it wired up you will need to upload the following code to your Seeeduino. // reading liquid flow rate using Seeeduino and Water Flow Sensor from Seeedstudio.com// Code adapted by Charles Gantt from PC Fan RPM code written by Crenn @thebestcasescenario.com// http:/themakersworkbench.com volatile int NbTopsFan; //measuring the rising edges of the signalint Calc; int hallsensor = 2; //The pin location of the sensor. RF24Network for Wireless Sensor Networking. RF24Network is a network layer for Nordic nRF24L01+ radios running on Arduino-compatible hardware.
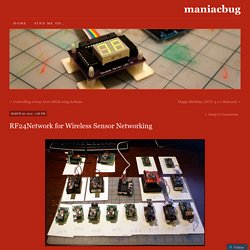
It’s goal is to have an alternative to Xbee radios for communication between Arduino units. It provides a host address space and message routing for up to 6,000 nodes. The layer forms the background of a capable and scalable Wireless Sensor Network system. At the same time, it makes communication between even two nodes very simple. Today, I managed to get 17 nodes running on a single network. Hardware The fastest way to get RF24Network-compatible hardware is to build the Getting Started board, or the ProtoShield board as explained in other posts, attached to commercially-available Arduino. Ultimately, I wanted something smaller, cheaper and more power-efficient, so I built a Low Power Wireless Sensor Node. Simple Transmit/Receive The Hello World examples illustrate how simple it is to communicate between two nodes. There are three simple sections: Static Initialization setup() Receiver loop() Getting Started with nRF24L01+ on Arduino.
Nordic’s nRF24L01+ 2.4GHz RF radios are a great way to communicate wirelessly between Arduino’s.
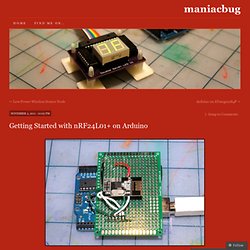
They’re cheap, and powerful. Unfortunately, they can be a little daunting to beginners to get started. Today, I want to make it easy for total beginners to get up and running on nRF24L01+ radios quickly and easily. Stuff we need First, we have to go shopping. Reasonable substitutes for this stuff can also be found at Sparkfun if you like spending a lot more money. Preparation We only need one of the 2×4 pin female headers. Cheap Arduino Wireless Communications. I was looking for a way to handle wireless communications between two Arduino boards.

Other options like Xbee or Bluetooth were going to cost $50 to over $100. Then I found a cheap RF transmitter and receiver at Sparkfun. The total cost is only $9! Here are a few limitations to RF solution: Communications is only one way. The advantages are that it is cheap and it is pretty easy to use. Below are some images showing how I hooked up the receiver and transmitter to two different Arduino boards. Here’s a picture of the my actual bread boarded circuit. Since the receiver is constantly picking up random noise I add a few extra bytes to every data packet. I broke the Arduino code into two files. I did all of my initial testing without any of these improvement and everything worked fine with these devices inside the same room. Linksprite. WiFi Shield V2.1 For Arduino (802.11 b/g/n)