
Diy wednesdays: knot trivet. Last month i bought lauren a set of “the family creative workshop” books for her birthday. we’ve been having a blast learning all sorts of new things as we make our way through the incredible variety of projects collected in the volumes. one section we were particularly excited to explore was all about knots, which we’ve long admired both for their usefulness and their beauty. this project is based on a “carrick bend” and is great for creating trivets and placemats, but you could just as easily hang it on your wall to be admired for its decorative charm. have fun!

Derek & lauren CLICK HERE for the full project after the jump! Here’s what you’ll need: -14 feet of 1/2” rope for an approximately 8” trivet (we recommend you play around with different lengths and thicknesses of rope until you find a size and style you like. the cotton rope is great for this project, but we couldn’t resist the nylon rope with its amazing patterns and colors.) 2. form a loop with the right (longer) piece as shown.
Scratch-Off Save-the-Date How-To. You won the lottery when you found each other, so send this cheeky save-the-date card to let guests share in your luck.
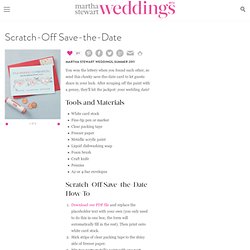
After scraping off the paint with a penny, they'll hit the jackpot: your wedding date! Tools and Materials White card stock Fine-tip pen or marker Clear packing tape Freezer paper Metallic acrylic paint Liquid dishwashing soap Foam brush Craft knifePennies A2 or 4-bar envelopes Scratch-Off Save-the-Date How-To Download our PDF file and replace the placeholder text with your own (you only need to do this in one box; the form will automatically fill in the rest).
Note: A card backed with decorative paper will fit in a size A2 envelope. Marbleizing Paper « Skip To My Lou. To make this fun and easy marbleized paper you will need: 1/2 tsp alum (helps paint adhere to the paper), 2 cups liquid starch, liquid acrylic paints, a long wooden skewer , a 9 X 13 pan and white copy paper cut to fit the inside your pan.
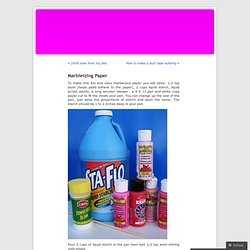
You can change up the size of the pan, just keep the proportions of starch and alum the same. The starch should be 1 to 2 inches deep in your pan. Pour 2 cups of liquid starch in the pan then add 1/2 tsp alum stirring until mixed. Gently drop acrylic paint on the surface of the starch. Some paint will sink to the bottom- do not worry. Take the wooden skewer and drag the paint through the starch. Lay your piece of paper on top of the starch. Lift the paper out of the pan and allow the starch to drip off the paper Rinse the paper under running water removing any extra starch. After the paper has been rinsed, lay it out to dry. You may find that you can print two sheets of paper before adding more paint to the starch. Have fun! Like this: Like Loading... Handmade and Decorative Paper from Paper Mojo.
Indian handmade paper, exporters handmade paper products wholesale paper india. Decorative Paper, Handmade Paper, Wrapping Paper and Collage Papers by PaperArts.Com. Handmade Paper, Decorative Paper, Art Paper, Silk Paper, Leather, Moonrock, Floral Paper, Invitations, Scrapbooks, Envelopes, Cards - Under The Sun. Marbled papers, handmade, decorative papers, paste papers, marbling, pattern designer, suminagashi, book endpapers, custom editions, art classes, artist's retreats, Estacada Oregon, Oregon artist, Skycraft Designs, Peggy Skycraft. Cave Paper. The Japanese Paper Place - Retail and Wholesale Supplier of Fine Japanese Papers.