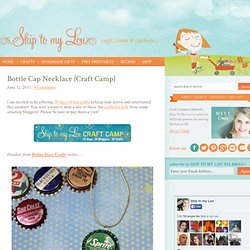
Easy macrame bracelet tutorial. I’ve been so wanting to do a tutorial and I finally decided on this cute little macrame bracelet.
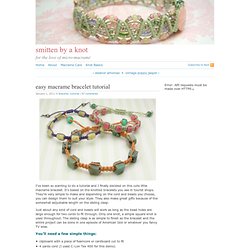
It’s based on the knotted bracelets you see in tourist shops. They’re very simple to make and depending on the cord and beads you choose, you can design them to suit your style. They also make great gifts because of the somewhat adjustable length on the sliding clasp. Just about any kind of cord and beads will work as long as the bead holes are large enough for two cords to fit through. Only one knot, a simple square knot is used throughout.
You’ll need a few simple things: clipboard with a piece of foamcore or cardboard cut to fit4 yards cord (I used C-Lon Tex 400 for this demo)8 or more beads depending on length of bracelet2 smaller beads for dangles3 straight pinsscissorsneedlepoint needle for finishing (has a round ballpoint end)needlenose jewelry pliers (optional) Instructions 1) Cut 2 pieces of cord about 24″, hold together and clip them under the clipboard about 8″ from the one end. Make your own jewelry out of scraps tutorial!!! Leather mustache necklace. As I promised yesterday: today I have a leather mustache necklace tutorial for you!
Inspired by all the mustache jewelry that I found online I decided that I could easily make my own DIY version of a mustache necklace. Learn how to make this leather mustache necklace after the jump. . . What you need for a leather mustache necklace - printed template (image above) - piece of thick black scrap leather. I used a piece of an old belt. - two small jump rings - jewelry pliers - chain necklace - scissors - pen - Cropodile.
Bottle Cap Necklace {Craft Camp} I am excited to be offering 30 days of fun crafts to keep kids active and entertained this summer!
You won’t want to miss a day of these fun crafts for kids from some amazing bloggers! Please be sure to pay them a visit! Heather from Dollar Store Crafts writes…… Bottlecap Necklaces. A few days ago, my daughter's best friend turned the all important age of 3.
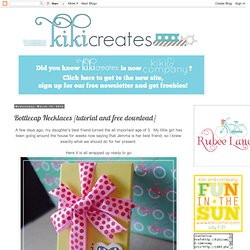
My little girl has been going around the house for weeks now saying that Jemma is her best friend, so I knew exactly what we should do for her present. Here it is all wrapped up ready to go: And on the inside? Stamped Initial Necklaces. How To: Delicate Necklace.
Share this image Share It Pin It I've been making simple jewelry since I was in high school and it's one of my favorite things to do while watching TV or listening to music.
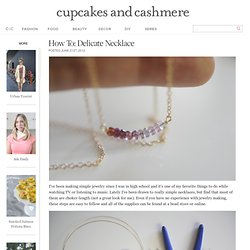
Lately I've been drawn to really simple necklaces, but find that most of them are choker-length (not a great look for me). Even if you have no experience with jewelry making, these steps are easy to follow and all of the supplies can be found at a bead store or online. Tools: Stones (I chose tourmaline), wire, chain, flat head pliers, wire cutters, and needle-nose pliers (you can also buy a set here). Step 1: Figure out how long you want the necklace (I made mine roughly 22" so I could slip it on over my head).
Step 2: Cut a piece of wire (approximately 3") - make sure it's longer than you need so that you have extra room to work with. Step 3: Wrap the wire around the tip of your needle-nose pliers (leave some room on the ends, as these will end up tying back around the base). Step 6: Add your stones to the wire. Glass Pendant Tutorial. At the risk of sounding like a broken record, I’ve seen these glass pendants on Pinterest and have wanted to try making some myself.
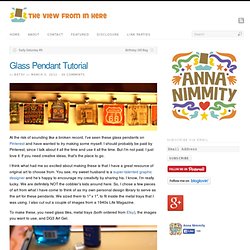
I should probably be paid by Pinterest, since I talk about it all the time and use it all the time. But I’m not paid. I just love it. If you need creative ideas, that’s the place to go. I think what had me so excited about making these is that I have a great resource of original art to choose from. To make these, you need glass tiles, metal trays (both ordered from Etsy), the images you want to use, and DG3 Art Gel. The printed images I used were printed from a color printer. I tipped the tray to cover the entire surface with the art gel. I used a paperclip to help get the gel into all the corners. Then I inserted the art and pressed it down, making sure that the entire image was laying against the bottom of the tray, not against the sides.
To let the art gel dry, I rested the pendants on the edge of the light table. Here is how they look now: Scrabble Tile Pendant Tutorial. I’m excited to share this tutorial for Scrabble Tile Pendants from Mark and Stefani at HomeStudio.

They’ve so graciously provided this how-to for making these lovely pendants to all of us crafters. These pendants are great for necklaces, charms, and gifts to give. To purchase these pendants with HomeStudio’s one of a kind designs, please visit their Etsy shop. Scrabble Tile Pendant Tutorial Supplies needed: · Paper · Scrabble Tiles · Scissors · Craft Glue · Metal File · Mod Podge · Small Paint Brushes · Utility Knife · Diamond Glaze · Super Glue · Small Aanraku Jewelry Bails in Silver. Silhouette pendants ♥ Hope your mother's day was lovely ♥