
Easy Pumpkin Rice Krispies Treats for Halloween. This past weekend the kids and I spent a lot of time with pumpkin.

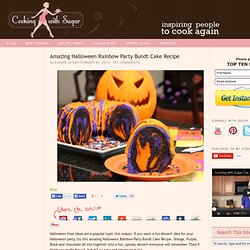
Between picking them at the patch and carving them for the front porch, we were in pumpkin heaven. So it only made sense to get in the kitchen and make some pumpkin fun in there too. I was digging through my stash of Wilton baking pans and ran into the Ice Cream Cookie Bowl pan that I had completely forgotten about. Turns out, it’s pretty darn perfect for making a realistic shaped pumpkin when filled with Rice Krispies Treats. To make these, all you need is your favorite Rice Krispies Treats recipe, the Wilton Ice Cream Cup Pan and a few small helpers eager to celebrate Halloween. While you’re melted the marshmallows and butter, add a little orange or red/yellow to create a nice bright orange color. (My favorite way to make Rice Krispies Treats: 6 TBS butter slightly browned, a splash of vanilla extract, 10.5 oz mini marshmallows, 6 cups of Rice Krispies cereal) Amazing Halloween Rainbow Party Bundt Cake Recipe. Print.
Cake Pops « Veronica's Cornucopia. **Update 5/12/11: If you are here looking for answers to cake pop questions, please check my Cake Pops FAQ and Troubleshooting Guide before leaving a comment.

I also have a recipe for making cake pops or balls with leftover or broken cake here, a recipe for Vegan Dark Chocolate Cake Pops, and a recipe for Cupcake Bites (cake balls that look like little cupcakes–the easier version of cake balls). For my full pops index, click here.** These pops are essentially cake truffles on a stick and are very simple to prepare: Bake a cake, mush it up with frosting, roll it into balls, insert a stick, and dip it in chocolate!
Want to make some? Cake Pops Makes 40-50 popsPrintable Recipe Bake the cake mix according to package directions. Roll mixture into 1″ balls and place on a cookie sheet. Melt chocolate in the microwave per directions on package. The cake balls will have a flat bottom from resting on the cookie sheet. Tap off the excess chocolate. See the two hiding in the corner? Brownies, as they should be. Vietnamese Coffee Jello. I know half of you, dear readers, are thinking "Ewww!

" And the other half are intrigued... I was intrigued when I read this recipe at The Food Librarian yesterday. I was so intrigued in fact that I had to run to Kroger to get some sweetened condensed milk so I could try this right away. I threw this Vietnamese Coffee-inspired Jello together in about 15 minutes yesterday evening, popped it in the fridge and eagerly waited for the gelatin to set. I had never even thought about making homemade Jello until my mother-in-law made those darling almond Jello eggs for Easter. This Vietnamese Coffee Jello turned out pretty darn tasty, if you like coffee and gelatinous things. The Jello can be cut into the most perfect, smooth cubes and are sturdy enough to be picked up and eaten with your fingers. Vietnamese Coffee Jello via The Food Librarian 1/2 cup cold water 2 cups strong coffee 1 (14oz.) can sweetened condensed milk 3 packages of Knox unflavored gelatin.
Brickle. A few weeks ago, I went to a barbeque.
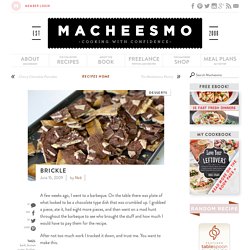
On the table there was plate of what looked to be a chocolate type dish that was crumbled up. I grabbed a piece, ate it, had eight more pieces, and then went on a mad hunt throughout the barbeque to see who brought the stuff and how much I would have to pay them for the recipe. After not too much work I tracked it down, and trust me. You want to make this. What’s fantastic about this stuff is many things. Directions 1) Line a rimmed baking sheet with foil. 2) Then layer in crackers. 3) Melt the butter in a saucepan and then stir in the brown sugar. 4) Once it has simmered for a few minutes, pour it straight on the crackers. 5) Next, stick your baking sheet in the oven at 325 degrees for 5-10 minutes. 6) When you take it out of the oven, pour the chocolate chips on the tray right away. 7) Meanwhile, crumble up some heath bars. 8) After 5 minutes, use a spatula to spread out the chocolate and make the chips flat. 11) Then just bust the stuff up!
Single Serving Pie in a Jar. These are individual-sized pies made in little glass jars that can go straight from your freezer to your oven to your mouth.

SO cute. You can make these with store-bought crust and canned filling or jazz it up with homemade like we do. And just for added cuteness we teamed up with crafting expert Lolly for some personalized tags. These are just about the best little gift from the kitchen you could share with someone! Pie in Jar This is the type of jar you’ll need. They’re half-pint jars, but short and squatty instead of tall and skinny (Ya know, like me as opposed to my mother. Step 1: Pie Dough The first thing you’ll need is dough. Step 2: Make a topper and line the jar Roll out a small handful of dough. Use the rest of the dough to line the jars.