
Wearing It On My Sleeves: And Then There Was...A Bracelet Tutorial. You say jump and I say how high, you say bracelet tutorial and I say how many pictures do you want, you say...ok ok I've had enough of your demands.

Take the tutorial and be happy you greedy readers you. Disclaimer: This is one of my firsts tutorials so I'm not the best at writing directions yet, if you have any questions ask away! You'll Need: Jersey fabric ( I used scraps from a t-shirt after making this t-shirt scarf) Super Glue Tape Acrylic paint and paintbrush (if you choose to jazz up your bracelet, I mean come on who doesn't like shiny things?) 1. If you are using scraps from a t-shirt cut the sleeve of the shirt off removing the hem as well. DIY bracelets. 5 Ways to Turn Zippers into Awesome Arm Candy.
UPDATE: By popular demand, Zipper Bracelet Kits ($15) and readymade Zipper Bracelets ($20) are now available in the Brit + Co. shop!

You know we love turning unconventional materials into wearable accessories. Today, we’re tackling zippers! We figured out 5 simple, beautiful ways to create bracelets, cuffs, and bangles out of metal, plastic, and repurposed zippers. Materials: - zippers - E-6000 quick hold contact adhesive - velcro or snap buttons - leather crimps + clasps - Tools: needle nose pliers, sharp scissors First thing to do is get your zippers! 1. These bangles are sweet, and have a definite friendship bracelet vibe. DIY Chan Luu Bracelet. My goal this holiday season was to really try my best to make some homemade gifts.

So far I’m doing pretty well with my wreath, some burlap covered candles, some personalized coasters and this past weekend I gave a try at some jewelry. You may have noticed how wrap bracelets are everywhere lately. Chan Luu bracelets are extremely popular these days. They come in singles and also in wraps. I love love the look of these bracelets. I did the top bracelet by simply following this tutorial. 1. 2.Bring your needle up under the right cord through the center and pull the thread through. 3. 4. You will just continue to do this for every bead. I love my followers so come and join!! Like this: Like Loading...
Related Leather Wrap Bracelet The other day I was in Michael's craft store grabbing some material for a small project I'm working on when I walked by the jewelry isle. With 2 comments Another {DIY} Bracelet. Free Tutorial: Sliding Knot Adjustable Bracelet. Bracelets are the accessory item of the year and nothing is hotter right now than bracelets made with cording.

You can create hip, chic bracelets with a few art beads, some accent beads and cotton cord. These are quick and easy to make and oh-so-cute! I'm going to be showing you step-by-step how to create a sliding knot adjustable closure that can be used for a bracelet or even a necklace, if you so choose. My version shown here is a slight variation of the sliding knot technique you typically see.
This one is much simpler! Sweet Slide bracelets Here's what you need for the Sweet Slide bracelets: To make your bracelet, cut a piece of cord about 24 inches long. Now, you're ready to create your sliding closure! How to Make a Chinese Sliding Knot: 11 steps (with pictures) Diy: adjustable knot bracelet. I’ve noticed many simple cord, hemp, & leather bracelets recently, especially in large amounts stacked together. here is a quick & simple tutorial on how to get those two adjustable knots & make a boho-esque bracelet for your self.
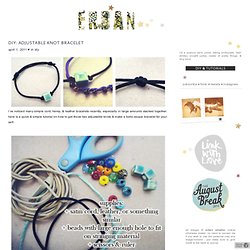
& remember to cut the excess cord. you can cut pretty close to the knot too, they don’t come lose very easily.also, sorry for the blurriness, it seems my sister has the shakiest hands ever (she was snapping some of the photos). the principle of this is pretty simple & you easily whip out some really pretty & low cost bracelets. wooden & old funky beads look the best i think. oh, & for the length of cord needed, i wrote 1.5 ft just to be safe…but a general rule is double what you are making; for a 7inch bracelet you will need around 14 inches & so on. i hope to make some more tutorial on knots & such so stay tuned. ugh. so happy it’s thursday already.
Like this: Like Loading...