
10 DIY Bracelets To Make This Weekend. Ten great DIY bracelets that will keep you busy crafting all weekend.
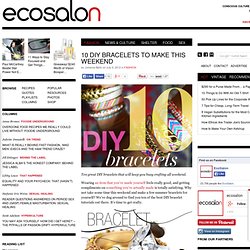
Wearing an item that you’ve made yourself feels really good, and getting compliments on something you’ve actually made is totally satisfying. DIY Bracelet Tutorials. DIY Wrap Bracelet. You should all know by now that we are all about stacking bracelets on our wrists.

The more, the better. In fact . . . the most, the best! With that being said, we’ll show you how to master a version of the ever so popular wrap bracelet. It’s so simple and addicting, you’ll soon be churning out these wristlets with your eyes closed. Clearly this arm party train isn’t stopping and it’s about time you get on board!
You’ll need (for a double wrapped bracelet) :* Lengths will vary depending on the size of your wrist (see comments for suggestions). Fold the length of leather cording in half to form a loop. Place the ball chain along the leather cording with the end of the chain meeting the end of the wrap. Continue wrapping while checking it for fit around the wrist. Tubular Friendship Bracelets. My line-up of DIY projects was put on hold last week when a friend’s grandfather passed away.

She asked if I could make her and her family a series of red, tubular embroidery thread bracelets to wear during the mourning period. And so back into the friendship-making mindset I went! Given that this woman not only threw me a whale of a baby shower, sewed the cover for the girls’ loveseat, knit Sunny the most adorable sock monkey stuffed animal, and hemmed fabric for a project I will unveil in the coming weeks, I dove right in. Since I spend up to four hours a day breastfeeding Courtland, I was fortunate to have a pattern in mind that was easy to do with baby strapped to boob. I used only red thread, but you could easily mix it up with an array of multi-colored strands for an interesting effect.
While certainly a sad reason to engage in this project, I am happy that a little tutorial could come from it. Quiet Lion Creations: chan luu. Chan Luu bracelets are just so cool!

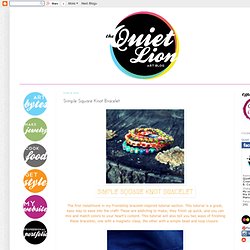
What's great about them is that they use simple macrame techniques to produce different results, this time with the addition of beads! This tutorial adds on to my previous Square Knot Friendship Bracelets, but utilizes the beads in a different way; on the outside of the knots as opposed to the inside. What you get is a totally different result! Step 1: Gather materials. Needed are 3mm glass gemstone beads, cotton thread for knotting, scissors, tape, and a bead and crimp for closure. Step 2: Start the knots. Once you have a couple of square knots, take either side of the thread and add beads to these threads. Take two beads right up to the last knot. Make a square knot, making sure the beads are caught in the knot and lie right on either side of the center thread. Quiet Lion Creations: Aurélie Bidermann's Fabric and Chain Bracelets. A cool boho-esque bracelet, super quick and easy to make.

From Aurélie Bidermann, these bracelets sell for a whopping $170 a pair. The fabric is just cotton (you can use fabric scraps for this) and the chain isn't gold or anything, it's silver-plated, the same you can buy at Michaels for a couple of bucks! And for the kicker, the bracelets are just tie-ons. Quiet Lion Creations: Simple Square Knot Bracelet. The first installment in my friendship bracelet-inspired tutorial section.
This tutorial is a great, easy way to ease into the craft! These are addicting to make; they finish up quick, and you can mix and match colors to your heart's content. ASOS Braided Friendship Bracelets. The next tutorial is pretty cool.
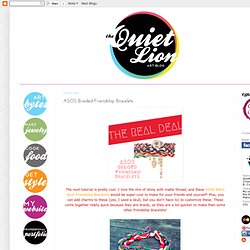
I love the mix of shiny with matte thread, and these ASOS Retro Skull Friendship Bracelets would be super-cool to make for your friends and yourself! The DIY: FASTEST FRIENDSHIP BRACELET EVER. We were super excited to share the Fishtail Friendship bracelet tutorial with you and we are even more excited to share that we've found an easier way to do it.

Don't get me wrong, I will still use the original technique to create more intricate designs but, this new tutorial is so quick you will end up wanting to make one in every color combination possible (like we did!) This tutorial is very similar to the other one so I will just share with you the differences. 1. You will only need to choose three colors of embroidery/friendship thread. Cut two pieces of each color at around 3 feet each. 2. 3. 4. 5.
Quiet Lion Creations: Re-Vamp your Friendship Bracelets! No, this tutorial does not have you making any type of designer DIY!
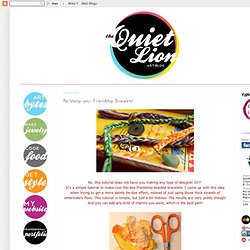
It's a simple tutorial to make cool the-dye friendship braided bracelets. I came up with this idea when trying to get a more dainty tie-dye effect, instead of just using those thick strands of embroidery floss. This tutorial is simple, but just a bit tedious. The results are very pretty though! And you can add any kind of charms you want, which is the best part! Step 1: Gather materials. Step 2: Cut your embroidery floss. Step 3: Group all of your individual threads into 3 big groups, making sure you get a variant amount of colors in each group. Knot at the end, when it's long enough to tie on your wrist. Happy Friday! (4 DIY Projects) Hi there, thanks for stopping by today!
