
Acrylic Paint Transfer. Supplies needed: Acrylic dabbers, photocopy of an image, water spritzer bottle, paintbrush, card stock, craft sheet and heat tool (optional) Take the lid off the dabbers and brush the paint onto the card stock, ensure you get a good coverage Take your photocopied image ( remember that you will get a reverse of the image, so don't use bold words), flip it over and place it in the acrylic.

Lightly press it down making sure it's smooth and not wrinkled Leave to air dry for at least 15 minutes and then if you wish give it a blast with the heat tool Only move onto this step when you are sure your paint is completely dryTake your water filled spritzer bottle, spray the back of the paper no more than two squirts, you don't want it too wet Next start to rub the paper very gently with your finger Keep rubbing and extra spritzing if you need too Eventually you will get rid of all the paper, but it does take a bit of patience as you have to be careful not to wet it too much and rub the image away.
Fabulous Find Friday with Bev!! - Blog Tiffany. Turn baby scribbles into bows (Gift Bow Tutorial) Benjamin and Lyla both love to color, but right now all they do is scribble.

I have stacks of sheets that Benjamin has colored all over and I was hoping to do something fun with them. I saw this tutorial at Smile Monsters for making your own paper gift bows and I immediately wanted to turn the scribbles into bows. These are such a great idea for wrapping presents (especially for the grandparents). Lyla helped color with markers. She loves the little (very washable) markers and gets them all over her face and hands. First, cut the paper into strips 8 and a half inches long and 3/4 of an inch wide. Next, fold the strip in half to mark the middle. Try to keep the ends somewhat pointy. Toilet Paper Origami Book. Corner-bookmarks.jpg. Diy idea: heart-shaped paper clips.
I love projects that make me smile and think “why didn’t i think of that?”. This fun heart-shaped paper clip project from jessica jones at how about orange is so easy it’s almost impossible to resist making a few of these at your desk right now. all you need is a paperclip and your fingers- because you’re just a few bends away from a heart-shaped way to keep your sweetie’s papers together. if i had children i would definitely use this to pin a sweet valentine’s day note to their lunches. click here for more info on jessica’s site. [thanks, jessica!] Diy-wedding-favor-bags-with-a-twist. There is something brilliantly refined and luxurious about paper which has been sewn on a sewing machine.
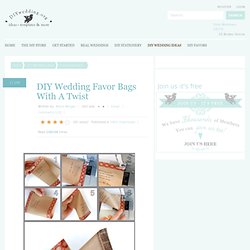
The string through the paper adds texture and a surprising little detail many people just can’t resist to carefully touch when they see it. I absolutely love these little DIY wedding favor bags. Every time I see them it dazzles me how easy and cheap they are to make! One sheet of 8.5x11" (A4) paper makes two small bags. The bags are perfect for small “light weight” treats like Salt Water Taffies or similar. Firstly cut a piece of 8.5x11" (A4) in half. Image 1: Fold half a 8.5x11" (A5) piece of paper in half without making a hard crease down through the middle. Image 2:Now place the top edge of your paper under your sewing machine's "presser foot". Image 3:With small stitches sew together the top part of the paper. How to Make an Impression: Extraordinary Thank-You Notes. January 10th, 2011 Email 400 users recommend These days, sending any thank-you note will get you noticed, but sending this thank-you note may very well get you hired!
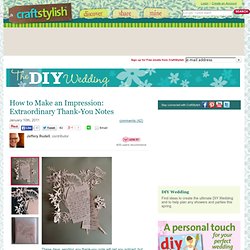
Jeff Rudell Try to keep your designs loose and unfussy. A handmade vellum envelope is a wonderfully mysterious way to wrap your note for delivery. Photo: Jeff Rudell One holiday, many years ago, I hand-made ornaments for everyone on my Christmas list. I couldn't fault my friends, of course. My tactic was a bit off the mark, perhaps, but my idea was sound. The great thing about paper is that while it may be temporary, it can also be a tremendously effective medium for memory-making. While I'll probably never tinker with Christmas again, I still try to put this temporary nature of paper to good use as often as possible.
Granted, not every note merits the time and energy required for this project. Also check out how to make my simple paper ornaments. View 4 member project galleries. Woven paper gift topper. I‘m pretty chuffed with these woven paper gift toppers.
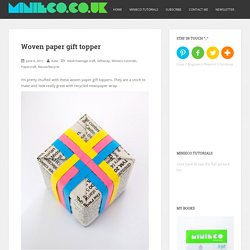
They are a sinch to make and look really great with recycled newspaper wrap. The idea originated from this woven yarn gift topper which you can see at giverslog.com and from this image which comes from the book More Last Minute Knitted Gifts. How-to ♥ Cut some strips of colored paper. Mine were 0.5cm wide. They need to be long enough to wrap around your gift. 6281009745_4017a45e64_o. Maemae paperie. Beautiful design and paper goods from MaeMae Paperie, including printable wedding invitations.
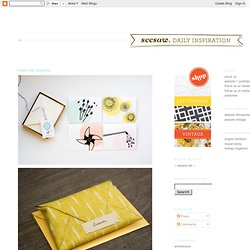
I'm a little obsessed with that cloth envelope. Megan is an AZ native and is hopefully swinging by our studio to say hello when she visits Scottsdale next month. Hooray for meeting blog friends in real life. Stardust (Part 1): DIY Glitter Tape. DIY Calling Cards. Custom Envelopes (Part 2)