
Keeping-occupied. Defi'13 - Un challenge pour conjurer le sort.
In the loop - Le webzine des arts de la laine. Day 16: Twisted Pearls - a diy pearl necklace. I am a lover of peach.
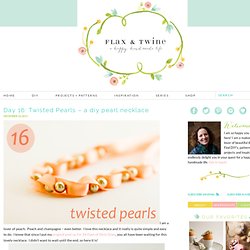
Peach and champagne – even better. I love this necklace and it really is quite simple and easy to do. I know that since I put my original post up for 24 Days of Girly Glam, you all have been waiting for this lovely necklace. I didn’t want to wait until the end, so here it is! There are so many fun things you could do with this technique. Head over to this page for more lovely necklaces and jewelry tutorials of all sorts! Materials: Embroidery thread (DMC 5) Apprx 40 glass pearls (8mm) 2 yards 3/8″ ribbon Needle Button (optional for closure) Elastic cord (optional for closure) Time: 40 minutes Cut two 36″ pieces of ribbon. You are going to start the beading on the side with your tail, so bring your thread back through. Trim your ends and thread your first pearl. Take one of the long tails of ribbon, thread the embroidery floss through it such that the ribbon rests nicely on top of the pearl, without a big gap.
Put on another pearl. La poitrine qui baille ? Esce que ça vous arrive parfois de bloquer sur vos photos de tricot (les votres ou les autres ?)
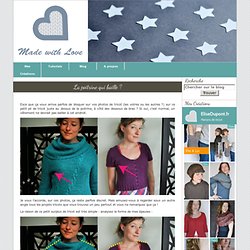
Sur ce petit pli de tricot juste au dessus de la poitrine, à côté des dessous de bras ? Si oui, c’est normal, un vêtement ne devrait pas bailler à cet endroit. Je vous l’accorde, sur ces photos, ça reste parfois discret. Mais amusez-vous à regarder sous un autre angle tous les projets tricots que vous trouvez un peu partout et vous ne remarquez que ça ! La raison de ce petit surplus de tricot est très simple : analysez la forme de mes épaules : Oui, en effet, elles sont en pente et non droites Pourtant, la majorité des patrons ne le prennent pas en compte. Il m’est soudain venu en tête la question d’une cliente, qui me disait : Pinterest. Spool’s Bird Softies. Ok, this is not bird overload, but we really do love birds here.

So here’s another fun DIY for a bird-themed wedding, especially if those lovely Anne Woods’ birdies are a budget no-go. The people from Spool created this PDF pattern that you could download for free. Instructions for sewing are also included. I think these would be great as caketoppers or even as additional reception decor (hang mobiles, use in centerpieces, use some more, or simply scatter ’round tables). The fact that you can still use them after the wedding is even better. Www.spoolsewing.com/blog/wp-content/uploads/2008/06/birdpattern1-1.pdf. Google Translate. Crochet Birds Pattern. Des p’tits moutons par louna.
AdelineH's Queue.
Tuto tricot. Step-by-Step: DIY Billy Ball Pillow By Brett Bara. By Aaron Welcome Brett Bara!
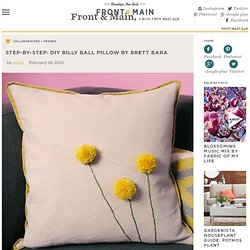
One of our favorite creative crafters and the founder of Brooklyn Craft Camp has shared step-by-step instructions for personalizing a west elm pillow with one of our favorite flowers — billy balls! … To me, a basic throw pillow is a perfect blank slate for DIY personalization — and in this tutorial I’ll show you some simple steps to embellish a west elm pillow with handmade billy balls, using basic embroidery and yarn pom-poms. To make the stems, we’ll learn the split stitch, and the billy ball tops are made from yarn pom-poms. What You’ll Need • west elm Cotton Velvet Duo Pillow Cover • Embroidery Floss — I used DMC in colors 905 and 987 • Medium-weight yarn — I used Koigu Kersti Merino Crepe in color K2180 • Embroidery needles • Yarn needle or tapestry needle (optional) • Sharp scissors Part 1: Stitch the Embroidery 1. 2. 3. 4. 5. 6. 7. 8. 9. 10. 11. 12. 13.
Part 2: Make the Pom-Poms 1. 2. 3. 4. 5. 6. 7. Tutorials. Craftiness Is Not Optional sewing, crafts, and parties fabric triangle headband tutorial-Jo-Ann spring crafts and a coupon March 18, 2014 By Jess 9 Comments.
My yarn-holding coffee can cubbies! Well I know I said last week that my studio series would be this week, but I still haven’t been able to get in a good photoshoot of the whole room because there hasn’t been any freaking sunshine since last Thursday!
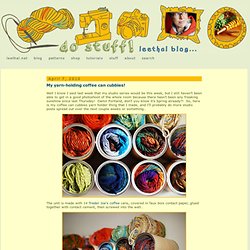
Damn Portland, don’t you know it’s Spring already?! So, here is my coffee can cubbies yarn holder thing that I made, and I’ll probably do more studio posts spread out over the next couple weeks or something… The unit is made with 14 Trader Joe’s coffee cans, covered in faux bois contact paper, glued together with contact cement, then screwed into the wall… The idea came from a project in Readymade a few issues ago – they covered Pringles cans with contact paper, and made a desk organizer – it looked awesome! Tissue Paper and Tulle Flower Tutorial. Well, here it is - a tutorial on how to make a tissue paper flower (with tulle).
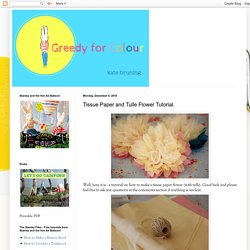
Good luck and please feel free to ask any questions in the comments section if anything is unclear. First of all, assemble your stuff - tissue paper (2 colours if desired), tulle, string and scissors. Cut two rectangles of each colour and two rectangles of tulle. The flower I have made used 38cm x 25.5cm sheets but it doesn't really matter, just so long as the pieces are all rectangular and of the same size. Lay the six sheets on top of each other. Once the folding is complete, bend it in half like a fan and tie it tightly (so that it gathers) in the middle with string Snip the ends with scissors to make a petal shape.
Fan out one side into a half circle. Then, delicately begin separating the layers, taking care not to ruin the pleats or tear the tissue paper (when this happens, don't cry... Continue separating and. Un album photo brodé d’un oiseau. Alabama Chanin - Life + Living.