
Shuriken Star Origami Box by Evi Binzinger. I love origami boxes.

Modular, single sheet designs, bowls, dishes… everything! And although modular boxes are usually more practical because they are sturdier, the single sheet self-locking ones are more fun to make! So if you fancy a bit of a challenge, try this ninja star-shaped box designed by Evi Binzinger. I made three of them! Find links to a crease pattern and video instructions in the description section.
Tags: Box, Evi Binzinger. Little guiding stars. Since the new year has started I’ve been trying to think of ways to be more kind to my self.

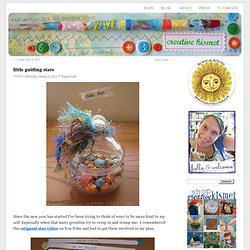
Especially when that nasty gremlins try to creep in and stump me. I remembered this origami star video on You Tube and had to get them involved in my plan. I thought it would be fun to make a whole bunch with kind words and “you are….” phrases inside. I made 60 of them, enough to last me the whole year if I open one a week, plus a few extra just in case. I used 12 x 12 inch scrapbook paper and cut 1/2 x 12″ strips, then followed the video HERE*. *UPDATE! Be Sociable, Share! {she made it} jersey weave sweatshirt.
Did you all have a good weekend?

We pretty much got snowed in so during nap time I thought i'd scratch this little diy off my to-do list... This was the inspiration for this diy. i've had it pinned on pinterest for an eternity. so when I came across $3 sweatshirts at wal-mart the other day i felt like it was just meant to be. i resisted grabbing more than two (i am so bad when it comes to good deals) brought them home and gave them both a good wash and dry. the other one is white and i already have something in mind for it... like it? Would love it if you pinned it :) For more fashion DIY posts simply click HERE. Embellished Flowered Cardigan {tutorial} <div class="greet_block wpgb_cornered wpgb_shadowed"><div class="greet_text"><div class="greet_image"><img class="enable-pib-img-under" src=" alt="WP Greet Box icon" data-recalc-dims="1"/></div>Thanks for coming by!

DIY: quick recycled headband · Sheepy Me. This morning I was looking at all the scraps that I have in my crafts drawer and knew that there were two options - to use them, or to throw them away. We're trying to optimize our stuff before moving out and to take only really neccessary things. Well, I'm not a person who likes throwing things away. I'm much more of a keeper kind, I love collecting things. Even if there's no more room to store them I will still find a way out and better choose to live my life in an overloaded one room apartment than feel sorry about something I threw away. I mean.. do I need an excuse to keep that pretty woolen green skirt that I may not wear today, or tomorrow or even this week, but maybe there will be a day when it will perfectly fit the situation.
So, let's talk about the scraps. First of all I cut 9 long strips of the fabric. For a better communication you can join Sheepy Me fanpage on Facebook and subscribe to RSS feed . Fold-Over Button Pillow (home decor) DIY Desktop Dream Catchers. We’re always looking for fun ways to decorate our desk spaces at work, and these mini dream catchers do just that!

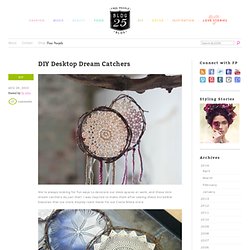
I was inspired to make them after seeing these incredible beauties that our store display team made for our Costa Mesa store: Brigette happened to have some leftover fabric from her reupholstered chair that I was able to cut little pieces of, and it worked perfectly. This is also a great project to use old crochet or vintage doilies for! The only other thing you need are twigs from a twig wreath, which I got at A.C. Moore. Using a needle and thread, sew the crochet doily to the twig wreath using each point of the doily, and wrapping the thread around the twigs so you’re simultaneously holding the twigs together as well. For the pieces hanging down from the dream catcher, I used thin strips of fabric and attached them to the twigs with a needle and thread. The result is a very shabby-chic dream catcher, don’t you think?
It fits in nicely at Brigette’s desk :) Photos by Julia.