Create a Glowing Abstract Light Vector Graphic. In the following tutorial, I'll show you how to create a glowing light abstract vector graphic. The great thing about this tutorial is it doesn't use any raster effects. The final illustration is all vector! In this tutorial, you'll utilize blends, different blend modes, and gradient meshes. Moreover, these techniques are real easy to apply to other illustrations. Create a new document that is 8 inches wide by 11 inches tall. Use the Rectangle Tool (M) and create a rectangle the size of your document. Fill the rectangle with a rich black (I used these CMYK values: C=100, M=100, Y=100, and K=100). With the Mesh Tool (U), click on the rectangle about an inch from the top in the center of the rectangle. After you add a mesh point with the Mesh Tool (U), change the color of the mesh point in the Color Panel to a dark blue (C=100, M=40, Y=0, and K=60).
With the Mesh Tool (U), create another mesh point in the center of the rectangle. Select your blend and drag it into the Brush Panel. Create On Trend Flat Type with a Nautical Theme in Adobe Illustrator. Vendors who are part of the IAB TCF938Reject allAccept all Purposes (Consent):Store and/or access information on a deviceCreate profiles for personalised advertisingUse profiles to select personalised advertisingPurposes (Legitimate Interest):Use limited data to select advertisingMeasure advertising performanceUnderstand audiences through statistics or combinations of data from different sourcesDevelop and improve servicesSpecial Purposes:Ensure security, prevent and detect fraud, and fix errorsDeliver and present advertising and contentSave and communicate privacy choicesCategories of data:IP addressesDevice characteristicsDevice identifiersProbabilistic identifiersBrowsing and interaction dataUser-provided dataNon-precise location dataUsers’ profilesPrivacy choicesData Retention Period:31 daysYour Consent:Consent expiry: 5 years 1 dayCookie expiry may be refreshed during the lifetime.Tracking method: Cookies onlyShow details.
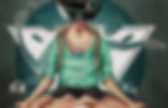
Using the Blend Tool to Create a Halftone Effect Portrait in Adobe Illustrator. The Blend Tool has been part of Adobe Illustrator for a long time and it's very simple to work with. The tool creates objects that fill the space between two key objects. Let's say we have a square as object A and a circle as object B; the Blend Tool will create intermediate figure shapes between these two objects. You can add how many steps you want and it remains editable until you expand it. We can use this tool to create many effects. In this tutorial I'll show you how to use the Blend Tool to create semi-realistic halftones with lines. To create a semi realistic illustration, a good stock is essential. Our work will be done in black and white, using black lines as halftones.
Now, let's increase the contrast between the blacks and whites. To make the visualization of the halftones even easier, let's apply the Posterize filter on the image by going to Menu > Image > Adjustments > Posterize and set the Levels to 10. Now we have our base image ready. Select "Layer 2". Daft Punk Poster in Illustrator. Using Gradients to Create a Slick & Fun Cartoon Worm in Adobe Illustrator. In this tutorial, I'll be showing you how to draw a slick and funny worm character from rough sketch to the final illustration. I'll be using various Adobe Illustrator tools and blending options. Let's get started! I usually start my drawing with a rough sketch in Adobe Photoshop, scanned pencil doodle or directly in Adobe Illustrator.
There is no need to add a lot of details, as we will add them later. We are going to use the Paintbrush Tool (B) and create our own brush for the outline of the worm. Choose Tints in Colorization Method in order to be able to recolor our brush strokes and leave other options as shown in the screen shot below. Our brush is ready, so let's start making a nice outline above the sketch. When the outline is finished, Select All (CTRL + A), go to Object >Expand Appearance and press OK in the pop-up window. Now let's apply basic colors to our worm using the Live Paint Bucket (K). Continue coloring the worm by clicking on its parts.
Here is the finished piece! How to Design and Vector a Set of Character Poses for a Video Game. How to Create a Set of Toggle Buttons in Adobe Illustrator. Vendors who are part of the IAB TCF941Reject allAccept all Purposes (Consent):Store and/or access information on a deviceCreate profiles for personalised advertisingUse profiles to select personalised advertisingPurposes (Legitimate Interest):Use limited data to select advertisingMeasure advertising performanceUnderstand audiences through statistics or combinations of data from different sourcesDevelop and improve servicesSpecial Purposes:Ensure security, prevent and detect fraud, and fix errorsDeliver and present advertising and contentSave and communicate privacy choicesCategories of data:IP addressesDevice characteristicsDevice identifiersProbabilistic identifiersBrowsing and interaction dataUser-provided dataNon-precise location dataUsers’ profilesPrivacy choicesData Retention Period:31 daysYour Consent:Consent expiry: 5 years 1 dayCookie expiry may be refreshed during the lifetime.Tracking method: Cookies onlyShow details.
How to Design a Flower in a Geometric Style. Vendors who are part of the IAB TCF938Reject allAccept all Purposes (Consent):Store and/or access information on a deviceCreate profiles for personalised advertisingUse profiles to select personalised advertisingPurposes (Legitimate Interest):Use limited data to select advertisingMeasure advertising performanceUnderstand audiences through statistics or combinations of data from different sourcesDevelop and improve servicesSpecial Purposes:Ensure security, prevent and detect fraud, and fix errorsDeliver and present advertising and contentSave and communicate privacy choicesCategories of data:IP addressesDevice characteristicsDevice identifiersProbabilistic identifiersBrowsing and interaction dataUser-provided dataNon-precise location dataUsers’ profilesPrivacy choicesData Retention Period:31 daysYour Consent:Consent expiry: 5 years 1 dayCookie expiry may be refreshed during the lifetime.Tracking method: Cookies onlyShow details.
How to Create a Semi-Transparent, 3D Text Effect in Adobe Illustrator. In the following steps you will learn how to create a colorful, semi-transparent, three-dimensional text effect in Adobe Illustrator. We'll start with some basic text and several Compound Paths and a built-in Calligraphic brush. Once we get our starting vector shapes we'll add the three-dimensional look using the Extrude & Bevel effect.
We'll use some simple vector shape building techniques and masking tricks along with some basic effects and blending techniques to give our three-dimensional shapes a semi-transparent look. Step 1 Hit Command + N to create a New document. Step 2 Using the Type Tool (T), add the "VECTORTUTS" piece of text, set the color at R=39, G=169, B=223 and use the "Doughnut Monster" font. Step 3 Select the text and go to Type > Create Outlines (Shift + Control + O). Step 4 Select the "V", the "C" and the "O" shapes and go to Effect > 3D > Extrude & Bevel.
Step 5 Pick the Ellipse Tool (L) and single click on your artboard to open the Ellipse window. Step 6 Step 7 Step 8. How to Create a Line Art Based Symmetrical Portrait in Adobe Illustrator. Vendors who are part of the IAB TCF938Reject allAccept all Purposes (Consent):Store and/or access information on a deviceCreate profiles for personalised advertisingUse profiles to select personalised advertisingPurposes (Legitimate Interest):Use limited data to select advertisingMeasure advertising performanceUnderstand audiences through statistics or combinations of data from different sourcesDevelop and improve servicesSpecial Purposes:Ensure security, prevent and detect fraud, and fix errorsDeliver and present advertising and contentSave and communicate privacy choicesCategories of data:IP addressesDevice characteristicsDevice identifiersProbabilistic identifiersBrowsing and interaction dataUser-provided dataNon-precise location dataUsers’ profilesPrivacy choicesData Retention Period:31 daysYour Consent:Consent expiry: 5 years 1 dayCookie expiry may be refreshed during the lifetime.Tracking method: Cookies onlyShow details.
How to Illustrate a Vintage Stopwatch in Adobe Illustrator. In today's tutorial, we are going to learn how to create a vintage stopwatch using basic shapes, Blends and Art Brushes in Adobe Illustrator. You'll learn how to use a variety of Illustrator tools. So let's get started! Step 1 To begin you will need to create the main geometry sketch of the stopwatch which is shown in the diagram below.
We'll be creating this initial plan to work from, there we can add highlights and shadows to make it look less flat. If you know how to achieve the main outlines of the object and its elements, go to the Step 7. If not, read the following steps carefully. The scaled images of the tiny stopwatch parts are shown below for your convenience. And here is the central button at the top. Step 2 Go to View > Rulers > Show Rulers (Command + R). Using the Ellipse Tool (L), create a circle filled with gray.
Repeat these manipulations in order to create the next circle shown below. Step 3 Copy it and Paste in Front (Command + C then Command + F). Step 4 Step 5 Step 6 Step 7. Creating a Bazinga! Text Treatment in Adobe Illustrator - Tuts+ With this tutorial I'll show you how to create a Bazinga text effect made famous by Sheldon from the sitcom The Big Bang Theory in Adobe Illustrator. We'll be using some techniques to add multiple effects to a single shape, also duplicating and copying objects quickly, as well as creating a pattern and even rotating that pattern without disrupting the shape it's applied too. Tip: Please be aware that you may have to install fonts before you open Illustrator in order for it to show up in your list of fonts. 1.
Create a New Document Let's start off by preparing our document. Open Illustrator and hit Command + N to create a New document. 2. Step 1 Now we'll create the very background color that our text will fit ons. Step 2 With the rectangle created let's style it. Step 3 You're welcome to stop here but let's give the background some depth and also add a gradient. 3. We'll need to center the circle inside our rectangle shape now. 4. 5.
Now we'll adjust the angle our text is on. 6. Step 4 Step 5. The Great Gatsby Art Deco Style in Illustrator and Photoshop. Master Illustrator CS6's new Pattern tool. Adobe Illustrator & Photoshop tutorial: Use gradients to make character designs pop. How to Create a Colorful Stylized Portrait in Adobe Illustrator. This tutorial focuses on creating a vibrant, poppy portrait in Adobe Illustrator. Using bright colors, transparent gradients, and a sense of whimsy, you'll be constructing facial features and candy hair in no time. Step 1 Get your sketch ready. Either fire up Photoshop or some other drawing program, or scan in some pencils. Your sketch can inform you of anything from a simple idea to your full color profile. Step 2 Using the Pen Tool (P), either trace the contour of the face you've drawn, or build it anew with a simple circle and some angled lines to create the jaw. Technically, if you want to create a full head, that circle should be much higher up.
Here's how my Layers panel currently looks, with my two shapes for the head and a solid filled Rectangle (M) as the background. Step 3 Ears, neck, hair, and simple background elements. Group like shapes together for easier layer management (Ctrl + G). Step 4 One major component of bright, colorful artwork is deciding if you're using black or not. Create an Inspirational Vector Political Poster. Adobe Illustrator Tutorial: Brush Basics For CS-CS3 Users - Vectology.com. How to Create a 3D Folded Map with Adobe Illustrator. How to Create a Self-Portrait in a Geometric Style. In this tutorial we’re going to talk about how to create an illustrated self-portrait in a geometric style. We’ll be using a photograph of ourselves as the base of the illustration, drawing a sketch from that, and then creating the final piece. Let’s get started! Since posting this tutorial, readers have been inspired to create their own self portraits in this style. Check out what they’ve achieved over on a special edition of Tuts+ Workshop: Created by You.
First, we take or select a photo. Because we're going for a symmetrical look, make sure you get a close up shot of your entire face and shoulders. In this case I’m going to take a picture with my webcam. Now, create a New Document (cmd+N or ctrl+N) in Adobe Illustrator with an artboard size of 600 x 480px. We are going to organize the layers as follows: The top layer is named “Draw”. Lock the "Background" and "Photo" layers. Now you can delete the "Photo" layer. Change the Opacity of the sketch to 30% and lock the "Sketch" layer. Create a Simple Button With Gradient Mesh In Adobe Illustrator - Vectology Tutorials | Adobe Illustrator Tutorials.
Adobe Illustrator Tutorial: The Making of VectorMan - Vectology.com. Create A Colorful Scene In Adobe Illustrator - Vectology Tutorials | Adobe Illustrator Tutorials. Tutorials - Vectology Tutorials | Adobe Illustrator Tutorials. Adobe Illustrator Tutorial: Gradients On Strokes - Vectology.com.