
DIY Wrap Bracelet - Honestly WTF - StumbleUpon. You should all know by now that we are all about stacking bracelets on our wrists.

The more, the better. In fact . . . the most, the best! With that being said, we’ll show you how to master a version of the ever so popular wrap bracelet. It’s so simple and addicting, you’ll soon be churning out these wristlets with your eyes closed. Clearly this arm party train isn’t stopping and it’s about time you get on board! You’ll need (for a double wrapped bracelet) :* Lengths will vary depending on the size of your wrist (see comments for suggestions). Fold the length of leather cording in half to form a loop. Place the ball chain along the leather cording with the end of the chain meeting the end of the wrap. Continue wrapping while checking it for fit around the wrist. When you have reached the end of the ball chain wrap the linen cording around the leather strands 2-3 more times. Thread the hex nut through the strands and tie a second knot.
Trim with scissors and your wrap bracelet is finished!! Double Cross Dress in Clothes Dresses at Nasty Gal. Jellyfish Jelly – Creative Kids » Blog Archive » I love a Discount Shop! Pattern.mccall.com/filebin/images/free_downloads/McCalls/PDF/memoryboard.pdf. Fabric Magnets. You know I can’t throw away scraps.

And you know how I love to incorporate these scraps into projects like here, here, and here. So how about another excuse to pull out the scrap-basket. These are quick and super easy. Not to mention, much cuter than the advertisement that was originally on the magnet. Dull. Cut out some fabric that is about the same size as the magnet. Trim around the edges of the fabric. Apply a generous amount of Mod Podge to the top of fabric. Allow to let dry and then trim any loose threads, if any. Slap onto the fridge, magnet board, or wherever. No está disponible. Well, here it is!

The Pottery Barn Kids Knock Off Tutorial! I am so happy with how it turned out and to share it hear with you! So this was my inspiration and obsession:) I went to my local goodwill and purchased a deconstructed flared lampshade and base for $3.54! You'll need about 3 yards of a heavy weight cotton material, a glue gun and a healthy stack of glue sticks to complete the shade. I started with the material and cut it in a width of about 17 inches. Next begins the ruffling. One you have goen through and finished all of your strips start by taking a strip and pulling the running stitch creating the ruffle. Once you adjust the ruffle evenly, take your tails on each side and create a double knot. Once you've knotted each end cut the tails off. Now onto the rosettes! Next, dab some glue in the top corner and fold it over to begin your rossette.
Valentine Heart. I saw this wreath over at Design Sponge and loved everything about it.
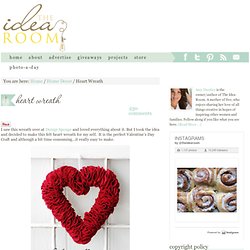
But I took the idea and decided to make this felt heart wreath for my self. It is the perfect Valentine’s Day Craft and although a bit time consuming…it really easy to make. This wreath is so easy to make but can be a bit time consuming. My hubby was recently out-of-town on business. So, over a couple of evenings I was able to watch some chick flicks and put together this wreath. I bought my heart shaped foam wreath at JoAnn’s (Michaels might have them too). I used a cup from my cupboard to make a 3 inch circle template. Then take a straight pin and pin it through the bottom of the point.
You will not need to do this on the back of the wreath. Valentine’s Day Topiary For other Idea Room Valentine’s Day Projects you might want to check out these! Felt Heart Wreath | Kissing Ball Wire Crate | TIssue Paper Kissing Balls Sealed with a Kiss | Candy Cane Heart Suckers | Love Potion no. 9. No está disponible. Here is a tutorial for making a cover/pouch for a Kleenex pocket pack.
Use a 1/4-in. seam allowance. (*don't add 1/4-in to the fabric, just sew at the 1/4-in line on your machine) You'll need two pieces of fabric. One for the outside, and one for the inner lining. These both should be the same dimensions: 7" H x 7-1/2" W.